Jenna is a self taught, home cook with a passion for baking. She gets her culinary inspiration by travelling abroad, and learning new culinary techniques.
Raspberry mousse dome recipe is made using half sphere silicone molds. The center of the raspberry mousse dome cake is filled with luscious white chocolate ganache. The dome cake case is made out of a shortbread cookie.
You could also use a different cake base if you wanted. A cookie crumble cake base would also work well with raspberry mousse.
Raspberry mousse by itself is incredibly decadent and satisfying. The shortbread cookie tones down the sweetness a little, giving it a more balanced flavoring.
For garnishing your raspberry dome cake, you could add a chocolate decoration, fresh raspberries, or a mint leaf.
White Chocolate Ganache Center Filling for Dome Cake
Place chocolate in a heat proof bowl.
Warm the heavy cream in a small saucepan over low-medium heat. As soon as it starts simmering, pour the heavy cream over the white chocolate.
Let the cream and chocolate sit for 5 minutes. Then mix with a whisk until it's smooth.
Add butter and let it melt into the mixture. Mix with a whisk until it's fully combined and smooth. Cool the white chocolate ganache to room temperature, then place it in the fridge until you're ready to use it.
Raspberry Mousse for Dome Cake
In a small bowl, mix together gelatin and 1/4 cup water. Let stand for 5 minutes while gelatin blooms.
In a medium saucepan, combine frozen raspberries, sugar, and 1/4 cup water. Warm the mixture until the sugar has dissolved and the raspberries are not frozen anymore.
Remove the mixture from the heat source and place into a blender to purée.
Place a sieve over a medium heat proof bowl. Strain the raspberry mixture through the sieve to remove the seeds. Using the back of a spoon, push the raspberry juice through the sieve as much as you can. It's quite time consuming, and you will throw out a lot of the raspberry mixture.
Place the raspberry mixture into the saucepan and heat on low-medium until boiling. Add gelatin and cook for 1 minute.
Cool the raspberry mixture to room temperature.
Pour whipping cream into a metal bowl for your stand mixer. Fit your stand mixer with the whisk attachment.
Whip the cream until stiff peaks form (5-7 minutes).
Fold the raspberry mixture into the whipping cream. Chill the raspberry mousse for 4 hours or until it's sturdy enough to use for your dome cake.
Shortbread Cookie Dome Cake Base
In a stand mixer fitted with the paddle attachment, cream together butter and sugar.
Slowly add flour and salt and cream together.
Press the cookie base into a 9"x13" pan lined with parchment paper.
Bake for 16-20 minutes at 350 degrees F.
Cool the cookie base. Make cut outs of your cookie base once it has cooled for your raspberry dome cake.
How to assemble Raspberry Mousse Dome Cake
You will have enough for 8 half sphere raspberry dome cakes. Reuse your half sphere molds as needed.
Use a spoon to heap the raspberry mousse into the silicone mold. Press it into the mold to ensure there are no crevasses that will form on the exterior of the dessert.
Using a melon baller, spoon 1 ball of white chocolate ganache into the center of the raspberry mousse filled silicone mold.
Add more raspberry mousse as needed to the outside of the ball of white chocolate ganache. You can also add raspberry mousse over the white chocolate ganache to fully encase it, if you want to.
Press the shortbread cookie (that you cut to size using a cookie cutter or glass) into the raspberry mousse and white chocolate ganache in the silicone mold. It's ok if it sticks out a bit from the mold.
Place the raspberry mousse dome cake in the freezer overnight.
Remove the raspberry mousse dome cake from the silicone mold.
Serve immediately. Freeze the raspberry mousse dome cake if you're not serving it right away. Let it thaw at room temperature for about 15 minutes before cutting into it. The raspberry dome cake is good for up to 1 month in the freezer.
raspberry mousse dome cake with chocolate mirror glaze
How to make an entremet cake recipe with chocolate mirror glaze
Prep Time21 hourshrs
Active Time18 minutesmins
Total Time21 hourshrs18 minutesmins
Course: Dessert
Keyword: dessert
Yield: 8servings
Materials
Shortbread Cookie Cake Base for Entremet
3/4lbbutterroom temperature
3/4cupsugargranulated
2 3/4cupsflourall-purpose
1/4tspsalt
White Chocolate Ganache Filling for Entremet
140gwhite chocolatemelting wafers
80mlheavy cream
1tbspbutterunsalted
Raspberry Mousse for Entremet Recipe
12ozraspberriesfrozen
1/4cupwater
2/3cupsugargranulated
2 1/4tspgelatin1 package
1/4cupwater
1 1/2cupsheavy cream
Chocolate Mirror Glaze for Entremet
38mlwater
4tspgelatin
2/3cupwater
2/3cupheavy cream
1cupcocoa powderunsweetened
280mlsugargranulated or fine
Instructions
Chocolate Mirror Glaze for Entremet
Place 38 ml water and gelatin together in a small bowl to bloom gelatin. Let stand for 5 minutes.
Using a whisk, mix together cocoa powder and 2/3 cup of water in a medium saucepan on medium heat. Make sure all of the clumps are removed, and it should become the consistency of paste.
Add a couple of tablespoons of the heavy cream to mix into the cocoa powder. Whisk until it has combined.
Add the rest of the heavy cream and sugar and mix with a wooden spoon as gently as possibly. You will not need your whisk anymore, as this will create bubbles, which can ruin the chocolate mirror glaze.
Bring the mixture until it starts simmering. Remove the mixture from the heat source right before it starts boiling.
Add the gelatin and mix together.
Place a fine mesh sieve over a small heat proof bowl. You'll want the sieve as close to the bottom of the bowl as possible, this will prevent bubbles from forming.
Pour the mirror glaze into the sieve. Let the mixture fall through on its own. It will take awhile to fall through (20-30 minutes).
As soon as the glaze is through the sieve, put a layer of plastic wrap touching the glaze to cover it. This will prevent the glaze from forming a skin on it.
Cool the chocolate mirror glaze until it reaches room temperature. You can place it in the fridge until you're ready to use it.
White Chocolate Ganache Filling for Entremet
Place chocolate in a heat proof bowl.
Warm the heavy cream in a small saucepan over low-medium heat. As soon as it starts simmering, pour the heavy cream over the white chocolate.
Let the cream and chocolate sit for 5 minutes. Then mix with a whisk until it's smooth.
Add butter and let it melt into the mixture. Mix with a whisk until it's fully combined and smooth. Cool the white chocolate ganache to room temperature, then place it in the fridge until you're ready to use it.
Raspberry Mousse for Entremet
In a small bowl, mix together gelatin and 1/4 cup water. Let stand for 5 minutes while gelatin blooms.
In a medium saucepan, combine frozen raspberries, sugar, and 1/4 cup water. Warm the mixture until the sugar has dissolved and the raspberries are not frozen anymore.
Remove the mixture from the heat source and place into a blender to purée.
Place a sieve over a medium heat proof bowl. Strain the raspberry mixture through the sieve to remove the seeds. Using the back of a spoon, push the raspberry juice through the sieve as much as you can. It's quite time consuming, and you will throw out a lot of the raspberry mixture.
Place the raspberry mixture into the saucepan and heat on low-medium until boiling. Add gelatin and cook for 1 minute.
Cool the raspberry mixture to room temperature.
Pour whipping cream into a metal bowl for your stand mixer. Fit your stand mixer with the whisk attachment.
Whip the cream until stiff peaks form (5-7 minutes).
Fold the raspberry mixture into the whipping cream. Chill the raspberry mousse for 4 hours or until it's sturdy enough to use for your entremet cake.
Shortbread Cookie Cake Base for Entremet
In a stand mixer fitted with the paddle attachment, cream together butter and sugar.
Slowly add flour and salt and cream together.
Press your cookie base into a 9" springform pan. Try to make it as even as possible. If you're making entremet dome cakes, press the cookie base into a 9"x13" pan lined with parchment paper.
Bake for 16-20 minutes at 350 degrees F.
Cool the cookie base. Make cut outs of your cookie base once it has cooled if you're making entremet dome cakes.
How to assemble Entremet Cake Recipe with Mirror Glaze
With your cookie base in your 9" springform pan all cooled, add your white chocolate ganache layer overtop. Spread it evenly, leaving about 1 cm of margin of cookie on the outside.
Add raspberry mousse on top of the white chocolate ganache. Spread it evenly, and make sure the top looks nice and flat.
Freeze the Entremet cake overnight or 8-12 hours.
Remove the chocolate mirror glaze from the fridge and let it come to room temperature.
If the glaze looks lumpy or has bubbles in it, strain the mirror glaze again before using.
Remove the outer ring from the springform pan.
Place the cake on a wire rack over a plate to catch any drippings.
You will have enough mirror glaze for 2 cakes. Freeze the rest of your mirror glaze to use at a later date. Pour the mirror glaze over the cake. Use a spoon if you need to fill any spots that do not have mirror glaze on them.
Serve immediately. Freeze the entremet cake if you're not serving it right away. Let it thaw at room temperature for about 15 minutes before cutting into it. The entremet cake is good for up to 1 month in the freezer.
How to assemble Entremet Cake Recipe as a Dome Cake with Mirror Glaze
You will have enough for 8 half sphere entremet dome cakes. Reuse your half sphere molds as needed.
Use a spoon to heap the raspberry mousse into the silicone mold. Press it into the mold to ensure there are no crevasses that will form on the exterior of the dessert.
Using a melon baller, spoon 1 ball of white chocolate ganache into the center of the raspberry mousse filled silicone mold.
Add more raspberry mousse as needed to the outside of the ball of white chocolate ganache. You can also add raspberry mousse over the white chocolate ganache to fully encase it, if you want to.
Press the shortbread cookie (that you cut to size using a cookie cutter or glass) into the raspberry mousse and white chocolate ganache in the silicone mold. It's ok if it sticks out a bit from the mold.
Place the entremet dome cake in the freezer overnight.
Remove the entremet dome cake from the silicone mold.
Place the entremet dome cake on a wire rack over a plate to catch any drippings. Pour the mirror glaze over the cake. Use a spoon if you need to fill any spots that do not have mirror glaze on them.
Sprinkle gold dust if desired and garnish the cake with a chocolate decoration or mint leaf if desired.
Serve immediately. Freeze the entremet dome cake if you're not serving it right away. Let it thaw at room temperature for about 15 minutes before cutting into it. The entremet dome cake is good for up to 1 month in the freezer.
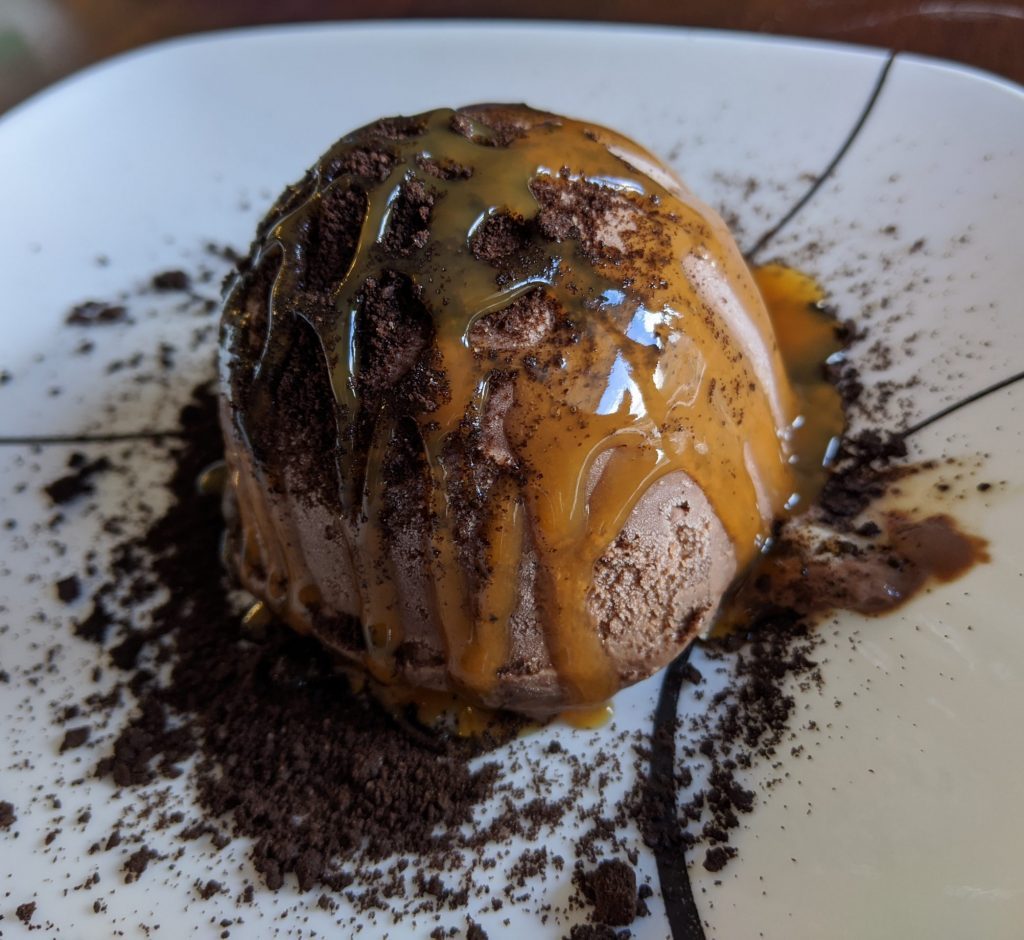
Tartufo is an Italian dessert which is composed of a minimum of 2 different ice creams and filling in the center. The center can be filled with jam, ganache, chocolate sauce, etc.
Center filling – jam, chocolate ganache, fruit, etc.
1-3 toppings for the ice cream (cookie crumble, caramel sauce, cocoa powder, sprinkles, etc.)
Decide on your ice cream and center filling. In our recipe we will be using chocolate ice cream as the outer layer, espresso ice cream for the middle layer, and dark chocolate ganache as the center filling. The toppings we’ll be using are caramel sauce and cookie crumble.
If you’re using chocolate ganache as your filling, make sure it’s chilled and ready to use to fill your silicone molds.
Begin with the outer layer of ice cream. Your outer layer will be the one that will have your toppings on it.
Place your ice cream in the silicone mold. Use a metal spoon to press the ice cream around so that all of the sides are covered in ice cream. Try to make it a 1/2 cm in thickness. Place each silicone mold in the freezer in an airtight container as you complete them. They will start to melt very quickly and it will be messy.
Freeze for 30 min – 1 hour. Then you’re ready for your next layer. Select your inner layer of ice cream. Use a fresh metal spoon to put the ice cream in the molds. Press the ice cream into the first layer so it’s completely covered. The thickness isn’t as important for this one, just make sure you leave a bit of space for the center flavor.
Freeze for 30 min – 1 hour. Now you’re ready for your final layer. Use a melon baller or a fresh spoon to scoop your center filling (ganache, jam, fruit, etc.).
Press your final layer into your silicone mold. It doesn’t have to be flat by any means, just make sure it’s filled and pressed into your second layer.
Use your fingers on either side of the silicone mold to peel the outer silicone mold off of the ice cream, with your thumb on the top of the mold pushing the ice cream out. Try to take them out and place them directly onto your serving plate.
Once you have all of your desserts on their serving plates, you can top your ice cream. Use 1-2 toppings for your layered ice cream dessert.
Tartufo made with silicone mold
Creating this layered ice cream dessert is called a “Tartufo”.
Creamy crab pasta recipe is made with a linguine cream sauce and sundried tomatoes.
Serve creamy crab pasta with garlic bread for a satisfying mid week meal. Create this delicious pasta in only 30 minutes using a can of crab from your pantry.
Creamy crab pasta is a tasty and savory meal you can serve to your entire family. It makes leftovers easy for your lunch the following day, since it will stay good for up to 3-4 days in the refrigerator.
Pesto bread appetizer is a savory appetizer that you can use as a pull apart bread, or cut into sections to serve. Pesto bread appetizer is a twisted bread recipe which creates a beautiful look to the bread when you serve it to your guests.
Pesto bread appetizer is topped with parmesan cheese which crisps up in the oven. The twisted bread recipe comes out of the oven golden brown when it’s finished.
We recommend serving the pesto bread warm as an appetizer. It’s best served right out of the oven to your guests.
Pesto bread appetizer uses fresh pesto which has more flavor than store bought pesto. You can substitute store bought pesto if you’re unable to make any fresh.
In a large stand mixer bowl, place yeast and warm water. Let stand for ~10 minutes until yeast blooms. Fit your stand mixer with the dough hook.
Add olive oil, salt, and flour to the yeast mixture. Set the stand mixer to low speed while it combines the ingredients together.
Set the dough to knead on low to medium speed for ~5 minutes. The dough should come away from the sides after a few minutes. If the dough is sticky, add 1 tbsp of flour as needed.
Remove the bowl from the stand mixer. Place a clean kitchen towel over the bowl and put it in a warm location in your house. Let the dough ball rise for ~1 hour until it doubles in size.
Roll your dough out on a floured surface until it reaches 18" x 12".
Spread pesto all over the dough, leaving a 1 cm margin from the edge of the dough.
Roll the dough lengthwise. Pinch either end of the dough to seal it.
Leave an inch from the top, then start cutting the dough in the center, down the middle, right through the dough. Twist the dough on top of one another. Twist each piece until you reach the end of the dough. Seal the ends of the dough together to make a circle.
Place the dough on a baking sheet. Add parmesan cheese all over the dough.
Bake at 425 degrees F for 25 minutes until crust is golden brown.
Serve immediately. You can serve it as a pull apart bread, or cut into sections for your guests.
Make your own flatbread recipe with yeast in only 1 hour. With about 45 minutes of rising time, you’ll have plenty of time to prepare your flatbread toppings.
You can use just about anything for your toppings that you would use on pizza, as you would on flatbread.
Flatbread toppings to try out:
arugula
prosciutto
balsamic vinegar
feta
avocado
pesto
pear
brie
spinach
caramelized onions
sundried tomatoes
basil
What is flatbread pizza
Flatbread pizza is thin crust pizza. Flatbread dough is rolled out to be much thinner, and therefore has a thin crust. Due to the thin crust, flatbread is crispy, whereas pizza is chewy.
Since flatbread has a crispy crust, people usually put different toppings on it than pizza, because it’s more of an appetizer. Usual toppings for flatbread include pesto, sundried tomatoes, BBQ chicken, pineapple, onions, arugula, balsamic vinegar, etc.
How long is flatbread good for
Flatbread dough is good for up to 2 days in the fridge. Cooked flatbread is good for 3-4 days in the fridge.
Combine yeast, sugar and warm water in a large mixing bowl. Let it sit for 5 minutes to active the yeast.
Add flour, olive oil, and salt to the mixing bowl. Mix with a fork or wooden spoon until it has started to come together. Turn onto a floured flat surface and knead the dough for a couple of minutes until it becomes smooth and elastic.
Place the dough back into the mixing bowl and cover with a clean kitchen towel. Let the dough rise for 45 min – 1 hour.
Cut the dough in half and roll out the dough. You should have 2 flatbreads to work with. The dough should be rolled quite thin for flatbread.
At this point you can add any toppings to the flatbread. It is recommended that you brush the flatbread with a bit of olive oil before adding your pizza sauce.
Bake the flatbread at 450 degrees F for 12-20 minutes. The flatbread edges will be light-golden brown, and the cheese will start browning when it's ready to come out of the oven.
Vegetarian pesto flatbread recipe is best made with fresh pesto. The secret to making a good pesto flatbread is adding more fresh pesto to the flatbread once it has come out of the oven.
Pesto is absorbed into the flatbread as it cooks, so the flatbread is a bit dry when it comes out of the oven.
Adding more fresh pesto the flatbread once it comes out of the oven adds back the sauce and moisture. The flatbread is the perfect combination of thin crust, and it is packed with flavor. You will love the sundried tomatoes and pesto together.
We recommend using fresh mozzarella for your pesto flatbread recipe. Fresh mozzarella is more flavorful and browns very well in the oven.
We have included a few pictures to see the difference between regular mozzarella vs fresh mozzarella for this flatbread recipe.
If you need to make some fresh pesto before starting your flatbread, try out our recipe.
Combine yeast, sugar and warm water in a large mixing bowl. Let it sit for 5 minutes to active the yeast.
Add flour, olive oil, and salt to the mixing bowl. Mix with a fork or wooden spoon until it has started to come together. Turn onto a floured flat surface and knead the dough for a couple of minutes until it becomes smooth and elastic.
Place the dough back into the mixing bowl and cover with a clean kitchen towel. Let the dough rise for 45 min – 1 hour.
Flatbread Toppings
Cut the dough in half and roll out the dough. You should have 2 flatbreads to work with.
Add 2 tbsp of pesto to each of the doughs. Using the back of a spoon, spread the pesto to create a thin layer of pesto as the "pizza sauce".
Add 8 slices of mozzarella around the dough. Do not overlap the cheese, it should have some space in between each of the cheese slices.
Add the sundried tomatoes around the flatbreads. Put them on the pesto, not on the cheese slices.
Bake the flatbread at 450 degrees F for 7-12 minutes. The flatbread edges will be light-golden brown, and the cheese will start browning when it's ready to come out of the oven.
Remove the flatbread from the oven and place it on a wooden cutting board.
Using a spoon, spoon the pesto onto the flatbread. While it's still warm, the pesto will melt into the pizza. This is a crucial step, and cannot be missed. Having the extra fresh pesto on the flatbread will make the pesto have more sauce, and will prevent it from being dry. Fresh pesto adds a ton of flavor to flatbread.
Cream cheese icing a memorable icing lathered on cinnamon rolls for a sweet treat.
Cinnamon roll icing is made with butter, powdered sugar, salt, and vanilla extract.
Cream cheese is added to buttercream icing to make cream cheese icing for cinnamon rolls.
Do cinnamon rolls with cream cheese frosting need to be refrigerated
Cinnamon rolls with cream cheese frosting need to be refrigerated. Any frosting made with cream cheese needs to be refrigerated to stay at a safe temperature. Thaw your cinnamon rolls out from the refrigerator for 20 minutes before serving. Alternatively, you can microwave your cinnamon rolls for 20-30 seconds to warm them up before serving.
The fridge will slow down the aging process of the cinnamon rolls as well, making them stay good for longer than if they remained at room temperature.
Cream butter and cream cheese together using a stand mixer or hand mixer. Cream together until light and fluffy. It's easiest to cream them when they are a bit soft. Leave the butter and cream cheese on the counter for 20 minutes to soften before using.
Add vanilla extract and salt into the cream cheese icing and beat for 30 seconds until fully combined.
Add 1 cup of powdered sugar and cream together. It's ok if the mixture isn't coming together yet, it will!
Add the last cup of powdered sugar and beat until the icing becomes smooth and thick ~ 3 minutes on medium-high speed. Be patient, it will come together.
Spread cream cheese icing on cinnamon rolls when they have cooled coming out of the oven. Cream cheese icing is enough for 12 cinnamon rolls to be iced.
Vanilla buttercream wedding cake is the most classic and traditional wedding cake flavor you can choose. Since vanilla is a neutral flavor, most people that attend your wedding will enjoy it.
Sometimes picking a wedding cake that has chocolate cake, will not go over well with everyone. It’s best to select a cake that most of your guests will enjoy, without being too shocking of a flavor.
Vanilla buttercream cake is made with a buttermilk vanilla cake base.
In between the layers are vanilla buttercream icing.
Alternatively, you could ice the cake with vanilla buttercream, and in between the layers you could make vanilla custard.
Adding Vanilla Beans and Custardto your Wedding Cake
Sometimes vanilla buttercream cake is made with real vanilla beans. If you choose to go with a vanilla bean buttercream cake, this can be a bit more expensive, but it’s worth it.
The vanilla bean is opened, and the vanilla beans are extracted from the pod. The pod infuses its vanilla flavor into vanilla custard. The remaining tiny vanilla beans will fill the custard with luscious vanilla flavor.
The outside of the cake will be covered in vanilla bean buttercream icing. The vanilla beans extracted are added to vanilla buttercream icing, adding a ton of vanilla flavor. Vanilla bean buttercream icing is much more flavorful than just regular vanilla buttercream icing.
Usually, vanilla buttercream cake is flavored only with vanilla extract, which can be just a hint of vanilla. Adding vanilla beans will be sure to overwhelm your taste buds and will be a huge hit at your wedding.
Vanilla bean custard adds a ton of flavor to your wedding cake. Vanilla custard is a sweet and rich addition to your wedding cake.
Vanilla custard is made by tempering eggs. Tempering eggs is fairly time consuming and laboring for a baker. Vanilla custard is warmed until it has thickened enough, and then it needs time to chill in the refrigerator until it’s ready to use.
I would highly recommend adding vanilla custard to your wedding cake. It will take your wedding cake from tasty to mouthwatering.
Fortune Hill Photography
Lemon Custard Wedding Cake
Lemon custard wedding cake is a light, and tangy cake for your wedding.
Lemon custard wedding cake is made by adding fresh lemon juice and lemon zest to a vanilla cake base. Lemon cake will have strands of lemon zest throughout the cake base, making it quite eye catching when it is served.
In between the layers of lemon cake is lemon custard.
Lemon custard has a bit of a tart and sharp taste to it, since it has lemon juice added to it for the flavoring.
Lemon custard wedding cake can be frosted with either a lemon cream cheese frosting, or a lemon buttercream icing.
Lemon cream cheese frosting will be a bit more creamy and full than lemon buttercream icing.
Lemon custard wedding cake has a strong pungent flavor. I would recommend adding lemon cream cheese frosting, as this will make the cake have complimenting flavors, and won’t be too overwhelming with lemon flavor for your wedding cake.
Champagne cake one of the newest trends in wedding cakes. Champagne has hints of lemon, peach, almond, or white cherry notes depending on the bottle of champagne.
By adding these hints of flavor to a wedding cake, it gives just a touch of citrus and toasted almond flavors that come together well for a light and flavorful wedding cake.
Champagne cake is made by adding champagne to a vanilla cake base.
Adding Strawberry flavoring to champagne wedding cake
For a little more succulent flavor, strawberry extract, and chopped strawberries are added to the champagne vanilla cake base.
Strawberries are a little bit sweet and acidic, making them a burst of flavor inside a wedding cake.
For the champagne cake layers, they have an added thin layer of champagne infused syrup. The cake has small holes poked in it to have the champagne syrup seep into the cake, making it a little sweeter with more champagne flavor.
Champagne strawberry wedding cake is filled with layers of cream cheese icing, made with whipped cream, strawberry extract and strawberry purée.
Champagne strawberry wedding cake is covered top to bottom in champagne buttercream frosting, with added strawberry extract and strawberry purée.
Champagne cake with strawberry buttercream is one of the most memorable cakes you can choose for your wedding. It has a light pink color to the frosting from the strawberries. When the cake is cut, it has the chopped strawberries popping with color throughout the layered pink cake.
Choosing a champagne cake for your wedding will thoroughly impress your guests by its unique special flavor. Most people will never have tried a champagne cake before, so it will be an remarkable choice for a wedding cake.
How are wedding cakes decorated
You can choose to have your wedding cake decorated with
detailed icing
painted icing
a cake topper
fresh flowers
sprigs of greenery
If you’re going with a more modern wedding, you can opt for detailed or painted icing on the sides of your wedding cake as added decoration.
For a rustic wedding you could choose to go with the fresh flowers or sprigs of greenery for your wedding cake decorations.
Choosing a cake flavor can be difficult depending on the occasion you need it for.
Here’s a few of our favorite cake flavor ideas for you to try out for your next get together.
We’ve complied a list of cakes flavor ideas that have everything from ombre cakes to champagne cakes to help with your selection of which cake flavor to choose.
Vanilla buttercream cake is made by baking a vanilla cake with buttermilk.
In between the layers are vanilla buttercream icing. Or, you could ice the cake with vanilla buttercream, and in between the layers you could make vanilla custard.
Cookie dough cake is made by baking a cake using vanilla and Greek yogurt at its base.
The cookie dough is made using a recipe that does not have eggs in it.
The cookie dough is made with mini chocolate chips, as to not be too overwhelming in the cake.
The cookies are shaped, chilled, and gently placed into the cake, and then the cake is baked. The rest of the cookie dough is shaped again so it’s flat and chilled.
This will act as the top of the cake and will be crumbled to look like mini bits of cookie dough.
In between the layers of cookie dough cake, is cookie dough frosting.
Cookie dough frosting is made by adding a little bit of flour, brown sugar and mini chocolate chips.
The brown sugar gives the look of cookie dough by turning it a golden brown color. Covering the cake on the top is chocolate ganache with the bits of cookie dough crumbled on top.
Chantilly cake is made by first baking a vanilla cake base.
A Chantilly cake has a unique frosting that is made by combining whipped cream, mascarpone cheese and cream cheese together to a buttercream frosting base.
The layers of cake are made by creating a berry syrup, such as raspberry syrup, and then placing the unique cream frosting on top of the syrup.
Fresh berries are place into the cream frosting, making this beautiful and colorful layered cake.
Some of the berries that are too large, like strawberries, are cut in half to have an even layered cake.
When the Chantilly cake is sliced, you can see the colorful red and blue berries throughout the layered cake.
The Chantilly cake is covered in the cream frosting all over the sides and top of the cake.
Chantilly cake is usually topped with a few fresh berries, giving it an eye catching look to it.
Strawberry shortcake is made by baking biscuits or vanilla cake.
In between the layers of cake or biscuits are vanilla bean and sugar coated strawberries and whipped cream.
The whipped cream helps hold the strawberries in place, and acts as an filler instead of icing or custard.
We use cookies to ensure that we give you the best experience on our website. If you continue to use this site we will assume that you are happy with it.