9 Ways to Use Silicone Molds

As an Amazon Affiliate, I earn from qualifying purchases.

There are countless ways to use silicone molds. Silicone molds are best used for foods that need to be solidified in the fridge or freezer. Silicone molds do not conduct heat well, and therefore should not be used in the oven. Learn how to use your silicone molds in 9 different ways to create stunning foods for your friends and family.

Hot chocolate bombs using silicone molds

  1. Melt chocolate and coat the sides of a half sphere silicone mold using the back of the spoon. Repeat with a second half sphere mold.
  2. Place the molds in the freezer for an hour
  3. Remove the chocolate from the silicone mold.
  4. Add 1 tbsp of cocoa powder to one of the chocolate shells, sprinkles, and marshmallows if desired.
  5. Melt the edges of the other chocolate shell on a warm place and press it together to seal the hot chocolate bomb.
  6. Top the hot chocolate bomb with a couple of strips of a different kind of chocolate and sprinkles to give it a beautiful finish.
9 ways to use silicone molds

Layered mousse cake using silicone molds

  1. Make your mousse cake by using a recipe that has been stabilized with gelatin to create your mousse cake. Let the mousse chill for a couple of hours.
  2. Select the inside of your mousse cake. Dark chocolate ganache or raspberry jam would go well as the center of your mousse cake.
  3. Create your mousse cake bottom. It could be an cookie crumble mixed with butter to stabilize it, and then bake it. Another option is almond dacquoise. It’s a little bit harder than a cookie crumble and has more thickness to it.
  4. Let it the bottom of the mousse cake cool to room temperature. Use a metal cookie cutter or a glass to gently cut the cookie into pieces that will fit perfectly for your silicone mold. Try to get it as exact as possible or a little smaller.
  5. Assemble the mousse cake by spooning the mousse into the silicone mold. Leave about 1/4″ thickness from the top of your mold to add the cookie to the mold at the very end. Leave enough room for the center of your mousse cake.
  6. Spoon the center into the silicone mold until it’s about level with the mousse.
  7. Add the cookie and press it into the center and mousse a little. It’s ok to have the mousse come around the edges.
  8. Freeze the mousse cake for about 4 hours to let it set.
  9. Remove the mousse cake from the freezer and gently peel back the silicone mold.
  10. You can add a mirror glaze to the top of your mousse cake, or a simple syrup to make it shine. You can dust the top with powdered sugar, cocoa powder, coconut flakes, or add a small amount of whip cream to the top to finish it off.
  11. Your mousse cake is ready to be served.
hot cocoa bomb silicone molds

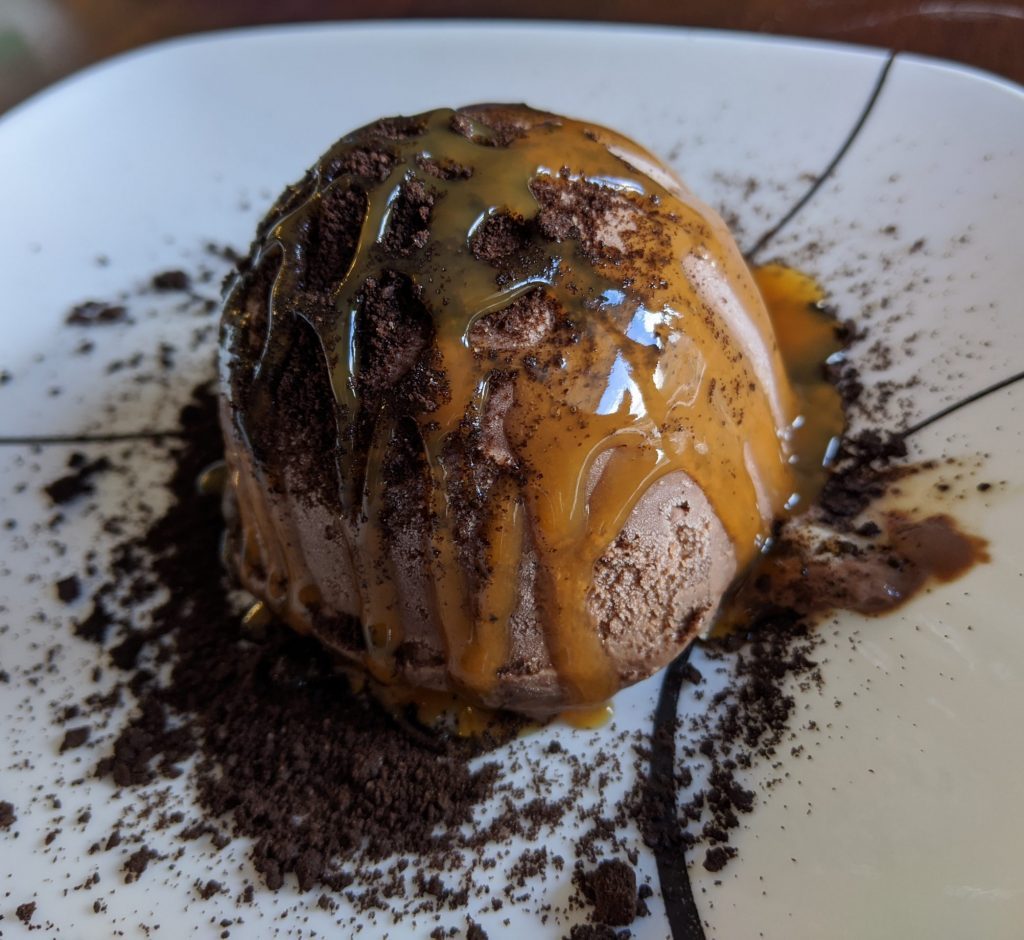
Layered dome ice cream cake using silicone molds

  1. Coat your exterior ice cream flavor in the half sphere silicone mold. Make sure the edges are completely covered right up the sides of the mold. Press the ice cream using the back of a spoon into the mold so it’s packed tight. Freeze for 30 minutes.
  2. Add your second layer of ice cream, keeping in mind that you still need a center. Coat the edges of your exterior ice cream in your second layer. Typically it’s nice to have them the same side roughly. Press your spoon into the center of your ice cream layers to create enough room for your next layer. Freeze for 30 minutes.
  3. Add the center to your ice cream dome cake. Add a complimenting flavor to your other ice creams you have selected. A couple of ideas for the center of your ice cream dome cake include: jam, chocolate ganache, lemon curd, or caramel sauce. Freeze for 4 hours until completely solid.
  4. When you’re ready to serve your dessert, remove the ice cream dome cake from the silicone mold by peeling away the edges and pressing the top with your thumbs to release it.
  5. Once you’ve placed your ice cream dome cake on a serving plate, you can add your final topping to it. A final topping for your ice cream dome cake could be: mirror glaze, caramel sauce, cookie crumbs, dusting of coffee, cocoa powder, or a combination of them. (If using mirror glaze, place the cake on a cooling rack and let the excess mirror glaze fall off before serving).
how to make desserts in silicone molds
Tartufo made with silicone mold chocolate ice cream at home
Tartufo made with silicone mold

Molded chocolates using silicone molds

  1. Temper couverture chocolate.
  2. Pour chocolate into silicone molds.
  3. Scrape excess chocolate using a pastry scraper.
  4. Tap silicone mold on counter a few times to remove air bubbles.
  5. Place in the fridge until completely solidified ~1 hour depending on how large the chocolates are.
  6. Remove the chocolate from the silicone mold.

Filled molded chocolates using silicone molds

  1. Temper couverture chocolate
  2. Pour chocolate into silicone molds until about halfway full.
  3. Tip the mold until the chocolate has reached the edges of the mold.
  4. Place the mold in the fridge for 20 minutes.
  5. Fill the chocolate with your filling. You could use jam, hazelnut sauce, or a cream filling.
  6. Pour more tempered chocolate onto the silicone mold.
  7. Scrape excess chocolate using a pastry scraper.
  8. Tap silicone mold on counter a few times to remove air bubbles.
  9. Place in the fridge until completely solidified ~1 hour depending on how large the chocolates are.
  10. Remove the chocolate from the silicone mold.
How to temper chocolate for molds
How to Remove Chocolate from Silicone Molds without breaking

Gummy bears using silicone molds

Gummy bears can be made by creating a sugar syrup with gelatin, corn syrup and sorbitol. The mixture is dyed with food coloring, and then poured into bear shaped silicone molds. The gummy bears take 24 hours to fully solidify in the fridge.

Chocolate cups using silicone molds

  1. Melt 1/3 cup of chocolate in the microwave using a microwave safe bowl. Melt in 30 second intervals and stir in between intervals until fully melted.
  2. Obtain your clean and dry silicone molds you want to use to make chocolate cups with.
  3. Use your spoon to dip into the chocolate and coat the sides of the silicone mold.
  4. Use the back of the spoon to guide the chocolate up the silicone mold.
  5. The trick to making chocolate cups with silicone molds is making sure the sides of the cup are quite thick. The thicker the sides, the less likely the sides are to breaking. If you do break the sides a little, you can always melt the edge on a plate to make a perfect circle around for your chocolate cup.
  6. Place in the freezer for 1 hour until fully hardened.
  7. To remove the chocolate cup from the silicone mold, pull the sides of the silicone mold until you have removed the edge of the chocolate all the way around the mold. Once the bottom edge is completely separated, press the top of the mold to release the chocolate cup from the silicone mold.
  8. To make the edges nice and perfect, melt the edge on a warm plate.
  9. Fill the chocolate cup and serve.
vegan espresso ice cream in chocolate cup
Vegan Coconut Milk Espresso Ice Cream

Peanut butter cups using silicone molds

  1. Melt 1/3 cup of chocolate in the microwave using a microwave safe bowl. Melt in 30 second intervals and stir in between intervals until fully melted.
  2. Obtain your clean and dry silicone molds you want to use to make chocolate cups with.
  3. Use your spoon to dip into the chocolate and coat the sides of the silicone mold.
  4. Use the back of the spoon to guide the chocolate up the silicone mold.
  5. Place in the freezer for 1 hour until fully hardened.
  6. Add a spoonful of peanut butter to the center of the peanut butter cup.
  7. Melt 1/4 cup of chocolate and spoon it over the peanut butter.
  8. Place in the freezer for 1 hour until solidified.
  9. Remove the peanut butter cup from the silicone mold by pressing the top of the mold to release the peanut butter cup from the silicone mold.
  10. Serve
How to store tempered chocolate

Cheesecake using silicone molds

  1. Bake the crust of your cheesecake using a baking pan. Fully cool the crust and use a cookie cutter or glass to cut the crust into the perfect shape for your silicone mold to sit on the top of it.
  2. Make your cheesecake recipe using a no bake recipe. Pour it into the silicone molds.
  3. Chill for 4 hours.
  4. Add the crust to the cheesecake.
  5. Gently remove the silicone mold from the cheesecake.
  6. Top with berry sauce of your choice.

How to Make a Chocolate Dome Cake

As an Amazon Affiliate, I earn from qualifying purchases.

You can create a chocolate dome cake with silicone molds and have it shaped as a half sphere.

chocolate ice cream in a silicone mold with caramel and oreo crumbs

Chocolate mousse is stable when making it with gelatin. Use a chocolate mousse recipe that has been stabilized with gelatin to create your chocolate dome cake.

Begin by making your chocolate mousse and letting it chill for a couple of hours.

Select the inside of your chocolate dome cake. Dark chocolate ganache or raspberry jam would go well as the center of your cake.

You can make a cake bottom to go with your chocolate dome cake. Your cake bottom could be an cookie crumble mixed with butter to stabilize it. Another option is almond dacquoise. It’s a little bit harder than a cookie crumble and has more thickness to it.

Once you’ve baked the crust for your chocolate dome cake, let it cool to room temperature. Use a metal cookie cutter or a glass to gently cut the cookie into pieces that will fit perfectly for your silicone mold. Try to get it as exact as possible or a little smaller.

Assemble the chocolate dome by spooning the mousse into the silicone mold. You could use a half sphere silicone mold to give it a dome cake look.

hot cocoa bomb silicone molds

Leave about 1/4″ thickness from the top of your mold to add the cookie to the mold at the very end.

Guide the mousse up the sides of the silicone mold leaving about 1/4″ thickness from the top. Make sure there’s a thick layer on the edges, and leave enough room for the center of your chocolate dome cake.

Spoon the center into the silicone mold until it’s about level with the mousse.

Add the cookie and press it into the center and mousse a little. It’s ok to have the mousse come around the edges.

Freeze the mousse cake for about 4 hours to let it set.

Remove the chocolate dome cake from the freezer and gently peel back the silicone mold.

You can add a mirror glaze to the top of your dome cake, or a simple syrup to make it shine. You can dust the top with powdered sugar, cocoa powder, coconut flakes, or add a small amount of whip cream to the top to finish it off.

Your chocolate dome cake is ready to be served.

Best Chocolate for Silicone Molds

As an Amazon Affiliate, I earn from qualifying purchases.

The best chocolate for silicone molds is Callebaut Belgian couverture chocolate.

  • Belgian chocolate
  • chocolate chips – easier to melt than a brick
  • couverture chocolate
  • luscious flavor
  • hints of caramel
  • large volume – enough to make a lot of chocolates

What is couverture chocolate

Couverture chocolate is best used when chocolates using silicone molds.

Couverture chocolate is made with a larger percentage of cocoa butter (>30%) than regular compound chocolate.

Due to the bigger portion of cocoa butter, this gives a more rich flavor to the chocolate than regular chocolate.

Callebaut Belgian couverture chocolate is the best chocolate for silicone molds because it processed to a finer chocolate, making the smoothness of the chocolate much more luscious and rich.

Why do you need to temper chocolate for silicone molds

There are 5 different types of crystals that can form and allow the chocolate to have different properties. 

If the melting temperature is too low, the chocolate will be crumbly and melt very easily. (Crystal type I)

If the melting temperature is too hot, the chocolate will be too hard. (Crystal type VI)

Chocolate that contains more cocoa butter will melt at a lower temperature.

Chocolate varies in their fat content, milk fat content, and shape of the fat molecules at a cellular level.

The best chocolate is made with Crystal type V.

Tempering chocolate for silicone molds involves breaking and reforming bonds of crystals.

When chocolate is in a solid brick form, the fat particles of the cocoa butter are in a crystalized hard form. 

When the crystals are warmed, the cocoa butter at the molecular level breaks apart these hard bonds to create a liquid state. 

Once the chocolate is allowed to cool, the bonds will form a more solid structure again.

Chocolate is tempered if it looks shiny and glossy.

Tempered chocolate should hold well at room temperature, and only begin melting at around 37 degrees Celsius.

Tempered chocolate should last up to a year, this is why it is preferred when making chocolate in silicone molds.

Milk ChocolateDark ChocolateWhite Chocolate
Melting temperature46 C49 C43 C
Cooling temperature26 C27 C25 C
Reheat temperature30 C32 C28 C

How to temper chocolate for silicone molds

  1. Place chocolate over a double boiler. There should be a couple of inches of water in a large saucepan. Place a large metal bowl over the saucepan. The bottom of the bowl should not touch the water.
  2. Heat the chocolate until the melting temperature has been reached. Use a digital thermometer to get an accurate reading.
  3. Take the chocolate off of the heat.
  4. Turn the heat off. Leave the saucepan with hot water on the burner.
  5. Place the chocolate filled bowl in another bowl full of ice water. The chocolate should not touch the water at all. Cool the chocolate until the cooling temperature has been reached.
  6. Put the chocolate bowl in the saucepan again and reheat until the reheating temperature has been reached.
  7. Your chocolate is ready to for your silicone molds.
  8. Pour the chocolate over the molds until they are completely filled and overflowing.
  9. Tap the silicone mold to remove any air bubbles.
  10. Scrape the excess chocolate off of the mold by using a bench scraper. You can reuse this chocolate again, just scrape it onto some parchment paper.
  11. Place the molded chocolate into the fridge for 20 min.
  12. Remove the chocolate from the silicone mold by gently pressing the chocolate using your thumb onto a plate.
How to keep chocolate bark from melting

Can you use normal chocolate for silicone molds

You can use normal chocolate for silicone molds if you don’t have chocolate for tempering. The difference will be that your chocolate will not have the shiny, glossy look to them. The chocolates will be much harder to bite into.

How to Use Silicone Molds

As an Amazon Affiliate, I earn from qualifying purchases.

Silicone molds are best used in the fridge or freezer to create delicious treats. Silicone does not conduct heat, and is therefore difficult to use in the oven. Therefore, we recommend using it in the fridge or freezer instead.

You can use silicone molds in a number of different ways including making layered mousse cakes, hot chocolate bombs, and ice cream dome cakes.

how to use silicone molds

Can silicone molds be used in the oven

Yes, you can use silicone molds in the oven safely. Silicone molds are very heat resistant, but always check the packaging to confirm the highest temperature you can use them at.

Does it take longer to bake in silicone

It does take longer to bake in silicone than with metal pans. Silicone does not conduct heat well, therefore it takes a lot longer to bake with silicone.

Darker molds can take longer to bake than lighter molds as well.

Always check cakes for doneness using a toothpick.

Do you put silicone bakeware directly on the oven rack

No, do not put silicone bakeware directly on the oven rack.

Use a cookie sheet underneath the silicone baking mold to stabilize it. It will be much easier putting it in and out of the oven with a cookie sheet under the silicone mold.

Is silicone bakeware better than metal

Silicone bakeware is not better than metal when baking in the oven. Silicone bakeware does not conduct heat. Aluminum baking pans are the best to use in the oven.

Do you need to spray silicone candy molds

You do not need to spray silicone candy molds.

Pop the candy out of the silicone mold by using your fingers to push it out.

If you use a spray when using your silicone mold, you could have a greasy sheen to them, which isn’t ideal when making candy.

When baking with silicone molds, what is the highest and lowest temperature you can use them at

The highest temperature you can have silicone molds at in the oven is 200°C without damaging them. They can withstand higher temperatures, but they will start breaking down if held at temperatures higher than 250°C. 

The lowest temperature silicone molds can handle is -60°C without breaking down. 

Check your package insert for exact temperature abilities of your specific silicone molds before using at extreme temperatures.

What are the advantages of silicone bakeware

  • Dishwasher safe
  • Freezer safe
  • Microwave safe
  • Oven safe

How do you clean silicone bakeware

Use soap and water. Do not soak for extended periods of time.

Wash quickly with soap and water or place in the top rack of the dishwasher to clean. Do not use abrasive cleaners on silicone.

How to use silicone molds for a layered mousse cake

You can create a layered mousse cake with silicone molds and have it shaped as a half sphere.

Mousse is fairly stable when making it with gelatin. Only use mousse that has been stabilized with gelatin to create your layered mousse cake.

Begin by making your mousse and letting it chill for a couple of hours.

Select the interior of your layered mousse cake. You can put chocolate ganache, lemon curd, raspberry jam, ice cream, etc. The possibilities are endless.

You can also opt for a cake bottom to go with your layered mousse cake. Your cake bottom could be an cookie crumble mixed with butter to stabilize it. Another option is almond dacquoise. It’s a little bit harder than a cookie crumble and has more thickness to it.

Once you’ve baked the crust for your layered mousse cake, let it cool to room temperature. Use a metal cookie cutter or a glass to gently cut the cookie into pieces that will fit perfectly for your silicone mold. Try to get it as exact as possible or a little smaller.

Assemble the layered mousse by spooning the mousse into the silicone mold. You could use a half sphere silicone mold to give it a dome cake look.

Leave about 1/4″ thickness from the top of your mold to add the cookie to the mold at the very end.

Guide the mousse up the sides of the silicone mold leaving about 1/4″ thickness from the top. Make sure there’s a thick layer on the edges, and leave enough room for the center of your layered mousse cake.

Spoon the center into the silicone mold until it’s about level with the mousse.

Add the cookie and press it into the center and mousse a little. It’s ok to have the mousse come around the edges.

Freeze the mousse cake for about 4 hours to let it set.

Remove the layered mousse cake from the freezer and gently peel back the silicone mold.

You can add a mirror glaze to the top of your dome cake, or a simple syrup to make it shine. You can dust the top with powdered sugar, cocoa powder, coconut flakes, or add a small amount of whip cream to the top to finish it off.

Your layered mousse cake is ready to be served.

How to use silicone molds to make hot chocolate bombs

Melt 1/3 cup of chocolate in the microwave in 30 second intervals. Mix in between each interval until the chocolate is smooth.

Using the back of a spoon, coat the silicone mold with chocolate. Only fill the chocolate up to a maximum of 3/4 of the way up the silicone mold. This will make it easier to remove later. Make sure you fill 2 semi-circle silicone molds for 1 hot cocoa bomb.

Place the silicone molds in the freezer for an hour.

Remove the silicone molds from the freezer.

hot cocoa bomb silicone molds

Gently pull the silicone mold away from the chocolate on the edges. Go around the whole circle gently removing the edges of the chocolate from the silicone mold.

how to remove hot chocolate bomb from silicone mold

Put the silicone mold upside down. Gently press the top of the silicone mold to release the chocolate from the mold. Be patient, and don’t be too aggressive when removing the chocolate from the silicone mold.

how to remove chocolate from silicone mold

Place the semi-circle chocolates on a warm plate to melt the edges of the chocolate. This will be to seal the hot chocolate bomb later.

how to seal hot chocolate bomb

Fill one half of the semi-circle with 1 tbsp of cocoa powder, sprinkles, and marshmallows.

Hold the filled semi-circle in one hand. Put the other semi-circle on top and gently press the 2 together to create a seal.

how to seal hot cocoa bomb

Top the hot chocolate bomb with any other types of chocolate, sprinkles, gold dust, etc.

how to decorate hot chocolate bomb

To use the hot chocolate bomb, place it in a mug and pour warm milk into the cup. Let it sit for a minute until the chocolate melts.

Stir the hot chocolate and it’s ready to enjoy.

How to use silicone molds for an ice cream dome cake

What you’ll need:

  • Exterior ice cream flavor
  • Interior ice cream flavor
  • Center (jam, chocolate ganache, lemon curd, caramel sauce)
  • Coating (mirror glaze, caramel sauce, cookie crumbs, dusting of coffee, cocoa powder).
chocolate ice cream in a silicone mold with caramel and oreo crumbs
  1. Coat your exterior ice cream flavor in the half sphere silicone mold. Make sure the edges are completely covered right up the sides of the mold. Press the ice cream using the back of a spoon into the mold so it’s packed tight. Freeze for 30 minutes.
  2. Add your second layer of ice cream, keeping in mind that you still need a center. Coat the edges of your exterior ice cream in your second layer. Typically it’s nice to have them the same side roughly. Press your spoon into the center of your ice cream layers to create enough room for your next layer. Freeze for 30 minutes.
  3. Add the center to your ice cream dome cake. Add a complimenting flavor to your other ice creams you have selected. A couple of ideas for the center of your ice cream dome cake include: jam, chocolate ganache, lemon curd, or caramel sauce. Freeze for 4 hours until completely solid.
  4. When you’re ready to serve your dessert, remove the ice cream dome cake from the silicone mold by peeling away the edges and pressing the top with your thumbs to release it.
  5. Once you’ve placed your ice cream dome cake on a serving plate, you can add your final topping to it. A final topping for your ice cream dome cake could be: mirror glaze, caramel sauce, cookie crumbs, dusting of coffee, cocoa powder, or a combination of them. (If using mirror glaze, place the cake on a cooling rack and let the excess mirror glaze fall off before serving).
how to make desserts in silicone molds
How to Serve Ice Cream at a Dinner Party

Recipes for Small Silicone Molds

As an Amazon Affiliate, I earn from qualifying purchases.

Small silicone molds can be used to create delicious chocolate filled treats.

How to make filled chocolates using silicone molds

  1. Temper your chocolate
  2. Fill the silicone molds half way full of chocolate.
  3. Gently tip the silicone mold to fill all of the sides of the chocolate to the edges.
  4. Place the silicone mold in the freezer for 20 minutes.
  5. Fill the silicone mold with your choice of filling. If you need an idea for filling your chocolates, try hazelnut sauce for your filling. Use a piping bag to pipe the small amount of filling in the center of the chocolates.
  6. Add more tempered chocolate to the silicone mold. Using a pastry scraper, push the chocolate over the hazelnut sauce until they are all full.
  7. Tap the silicone mold until all of the air bubbles are removed.
  8. Place in the freezer for another 20 minutes.
  9. Once the chocolate has completely solidified, you can gently remove the chocolate from the silicone mold.
How to temper chocolate for molds
How to Remove Chocolate from Silicone Molds without breaking

How to use a small silicone mold for ice wine

Select a small silicone mold that will well for a small drink of ice wine.

  1. Melt 1/4 cup of chocolate in the microwave using a microwave safe bowl. Melt in 30 second intervals and stir in between intervals until fully melted.
  2. Obtain your clean and dry silicone molds you want to use to make ice wine chocolate cups with.
  3. Use your spoon to dip into the chocolate and coat the sides of the silicone mold. If your spoon is too large, you can use a food safe paint brush to paint the chocolate onto the mold.
  4. Use the back of the spoon or paint brush to guide the chocolate up the silicone mold.
  5. Make sure the sides of the small chocolate cup are quite thick. The thicker the sides, the less likely the sides are going to break. If you do break the sides a little, you can always melt the edge on a plate to make a perfect circle around for your chocolate cup.
  6. Place in the freezer for 1 hour until fully hardened.
  7. To remove the chocolate cup from the silicone mold, pull the sides of the silicone mold until you have removed the edge of the chocolate all the way around the mold. Once the bottom edge is completely separated, press the top of the mold to release the chocolate cup from the silicone mold.
  8. To make the edges nice and perfect, melt the edge on a warm plate.
  9. Fill the chocolate cup with ice wine and serve.

Chocolate ice wine cups are a delicious treat to serve after dinner. Chill the wine, and let the chocolate cup sit at room temperature. When you’re ready to serve them, pour the ice wine into the chocolate cups and enjoy!

How to Make Chocolate Cups with Silicone Molds

As an Amazon Affiliate, I earn from qualifying purchases.

You can use large or medium silicone molds to make chocolate cups for desserts. You can easily make chocolate cups without balloons or paper cups. Silicone molds are reusable and very sturdy, they hold up well when making chocolate cups.

Tools to make chocolate cups

vegan espresso ice cream in chocolate cup
Vegan Coconut Milk Espresso Ice Cream

How to Make Chocolate Cups with Silicone Molds

  1. Melt 1/3 cup of chocolate in the microwave using a microwave safe bowl. Melt in 30 second intervals and stir in between intervals until fully melted.
  2. Obtain your clean and dry silicone molds you want to use to make chocolate cups with.
  3. Use your spoon to dip into the chocolate and coat the sides of the silicone mold.
  4. Use the back of the spoon to guide the chocolate up the silicone mold.
  5. The trick to making chocolate cups with silicone molds is making sure the sides of the cup are quite thick. The thicker the sides, the less likely the sides are to breaking. If you do break the sides a little, you can always melt the edge on a plate to make a perfect circle around for your chocolate cup.
  6. Place in the freezer for 1 hour until fully hardened.
  7. To remove the chocolate cup from the silicone mold, pull the sides of the silicone mold until you have removed the edge of the chocolate all the way around the mold. Once the bottom edge is completely separated, press the top of the mold to release the chocolate cup from the silicone mold.
  8. To make the edges nice and perfect, melt the edge on a warm plate.
  9. Fill the chocolate cup and serve.
hot cocoa bomb silicone molds

How to use chocolate cups

You can use chocolate cups for many purposes including:

  • ice wine
  • ice cream
  • mousse
  • tarts
  • custard
  • vanilla custard
  • chocolate mousse
  • raspberry mousse
  • mocha mousse
  • coffee mousse
  • raspberries
  • strawberries
  • kiwi
  • mandarin orange slices
  • whipped cream
  • hazelnut spread
  • pudding
  • Jell-o
  • maraschino cherries
  • iced coffee
  • angel food cake

How to clean silicone molds after use

Silicone molds can be cleaned using soap and water. Rinse the mold with water and set it to dry. Do not use the mold if it has any residual water on it.

How Fine should Almond Flour be for Macarons

As an Amazon Affiliate, I earn from qualifying purchases.

Almond flour needs to be sifted and very fine before using it for macarons. You can see how grainy the almond flour is before it’s been sifted.

how does a sifter work with almond flour

You can see the difference in the texture of the almond flour after it has been sifted. The texture is much finer and lighter. Almond flour needs to be crumbly and easily be rubbed with your finger tips.

How Fine should Almond Flour be for Macarons

There is a difference in how fine your almond flour is depending on which one you’re using for your recipe. You can find almond flour that specifically indicates it’s superfine. It’s best to use an almond flour that is already fine to begin with. Then you don’t have to grind the almond flour any smaller using a food processor.

To remove any clumps in your almond flour before using them for macarons, sift the almond flour right before using it. It’s easier to sift almond flour using a colander with a medium mesh, over a sifter with a fine mesh. Learn how to sift almond flour faster. See video here.

How Fine should Almond Flour be for Macarons

A colander can remove the large clumps that form in almond flour. You don’t need to use a fine mesh sieve in order to the the almond flour thin enough. A colander works well and is much faster than using a sifter.

Why Macarons Stick to the Silicone Baking Mat

As an Amazon Affiliate, I earn from qualifying purchases.

Undercooked Macarons

Your macarons will stick to the silicone mat if they are undercooked.

Bake your macarons for 1-2 minutes longer than when using parchment paper for the macarons to be easily peeled from the silicone baking mat.

Macarons are not fully cooled

Macarons will stick to the silicone baking mat if haven’t fully cooled before trying to remove them. Let them cool for at least 20 minutes before trying to remove the macarons. Usually it’s easier to leave the macarons on the baking sheet and let the macarons cool on the silicone baking mat for at least 20 minutes. Then peel the macarons off of the silicone baking mat and fill them.

Silicone baking mat is oily

Silicone baking mats cannot have any oily residue, or particulate present on the baking mat when using them for macarons. The macarons will absorb the oil while baking, making the macarons very difficult to get off of the silicone baking mat.

To remove oily residue from the silicone baking mat, wash it with soap and water and rinse to let dry.

If the oily residue is still present, pour boiling water on the silicone baking mat and it will clean the baking mat perfectly to use for your macarons.

Why Macarons Stick to the Silicone Baking Mat

Baking pan is old

Macarons need fresh aluminum baking pans to cook well. If your baking pan is old, unfortunately the macarons will stick to silicone and even parchment paper. Macarons need the conductivity of aluminum to cook evenly and for the temperature to be evenly distributed while baking. Use a new aluminum baking pan for cooking macarons if your pans are quite well used.

Baking pan is oily

Macarons will absorb any oil that’s present on the baking pan through the silicone or parchment paper. Remove any oily residue from the pan by washing it with soap and water.

If the baking pan will not become clean after using soap and water, pour boiling water on the baking pan. The boiling water will clean the baking pan to remove any oil that is present and make it freshly clean to use for baking macarons on.

Why Macarons Stick to the Silicone Baking Mat

10 Types of Mousse

As an Amazon Affiliate, I earn from qualifying purchases.

There are many different types of mousse you can make by using a custard base or whipping cream base.

By infusing different flavors into your mousse, you’re able to make a few different types of desserts. You can make layered mousse and make it into an entremet, or dome cake.

Try experimenting with a couple different types of mousse and topping it with a mirror glaze to be a bit more fancy.

Learn how to decorate mousse.

How to Decorate Mousse with fruit

Lemon Mousse

Lemon mousse is made by adding fresh lemon juice and lemon zest to the mousse.

If you’re wanting to make a dome shaped lemon mousse, the center portion can be lemon curd. Around the lemon curd would be lemon mousse.

This gives the cake a tart, flavorsome lemon flavoring that would go well with a serving of whipped cream.

Raspberry Mousse

Raspberry mousse is made by heating raspberries in a saucepan and adding sugar and water.

This creates a raspberry sauce.

The raspberry sauce is strained to remove the seeds of the raspberries, and only have the infused raspberry sauce left.

The gelatin is added to create a thickened texture.

The raspberry sauce is then adding to folded stiff peaks whipped cream and chilled to create a decadent raspberry mousse.

You can even opt for vegan raspberry mousse which involves using coconut milk instead of whipped cream.

Raspberry mousse typically is perfect on it’s own, or serve a small piece of milk or dark chocolate with it.

Types of mousse

Blackberry Mousse

Blackberry mousse is a fruity mousse with memorable blackberry flavoring.

Blackberry mousse is made by adding pureed blackberries and hot water in a blender and mixing together.

The blackberries must be strained and then the remaining blackberry sauce is cooked to thicken it into a puree.

Gelatin is bloomed in a bit of water, and microwaved together.

Heated gelatin is added to blackberry puree and and whisked together.

In a stand mixer fitted with the whisk attachment, heavy cream is whipped with vanilla extract until stiff peaks form.

Fold blackberry puree with gelatin into the whipped cream and chill until you’re ready to serve.

Blueberry Mousse

Blueberry mousse is made by making blueberry puree.

Blueberries are heated together with sugar and lemon juice in a saucepan over medium heat.

After the blueberry mixture has thickened, it is blended together and strained through a mesh sieve.

In a stainless steel mixing bowl, egg whites, sugar, and cream of tarter is mixed together. Heat the mixture over a pot of water simmering with a few inches of water in the bottom.

Once the mixture has thicken, it is removed from the heat source, and beat until the egg whites become stiff peaks.

In a stand mixer, heavy cream is a placed in a metal bowl fitted with the whisk attachment, and whipped until soft peaks are formed.

Gelatin is bloomed with a bit of water, and then whisked into the blueberry puree.

Egg white meringue is folded into blueberry puree to add a ton of light airiness to the mousse.

Finally, fold soft peak whipped cream into the blueberry mixture and chill for a few hours prior to serving.

Honey Mousse

Honey mousse can be easily made by mixing butter, egg yolks, honey, and white chocolate over medium heat in a saucepan. After the chocolate has completely melted, it is placed in a heat proof bowl.

Bloomed gelatin is warmed, and then slowly whisked into the honey mixture, and then it is let to cool to room temperature.

Heavy cream is beat until soft peaks form, and then it’s folded into the honey chocolate mixture.

Egg whites are beaten until soft peaks form, and then folded into the honey cream mixture to make honey mousse.

Honey mousse needs to chill for a few hours prior to serving.

Once combined and thickened, the rest of the whipping cream and be beaten until stiff peaks form and folded into the honey mixture to create honey mousse.

Guava Mousse

Guava mousse can be made by warming the guavas over medium heat until their juices start streaming out.

The guava juice needs to be strained and combined with 1 cup of water and reheated together. Add bloomed gelatin and combine with condensed milk.

Condensed milk gives the guava mousse a rich flavoring. Mix together with stiff egg whites and chill until ready to serve.

Vanilla Bean Mousse

Vanilla bean mousse can be prepared by whipping heavy cream with vanilla bean seeds and granulated sugar until soft peaks form.

Egg whites are beaten until foamy, and then granulated sugar is added to them. Egg whites are beaten until stiff peaks form.

Egg whites are folded into the cream mixture, and then chilled for a few hours prior to serving.

How to use vanilla beans

Cheesecake Mousse

Cheesecake mousse can be made by creaming together cream cheese, icing sugar, vanilla and lemon zest.

The cream cheese mixture is combined with stiff peaks whipping cream and folded together.

Graham cracker crust can be made and crumbled on the top of the cheesecake mousse for more of a traditional cheesecake flavor.

Durian Mousse

Durian mousse can be prepared by removing the insides of the Durian seeds.

Puree the insides of the durian.

Mix whipping cream and icing sugar until stiff peaks form, then fold the pureed durian into the durian mousse.

types of mousse

Chocolate Mousse

Chocolate mousse can be made a few different ways.

One way to make chocolate mousse is by mixing egg yolks and sugar together until light and fluffy. Warm heavy cream in a saucepan until simmering, not boiling.

Temper the eggs by slowly adding warm cream until fully combined.

Whisk the mixture vigorously as it’s slowly coming together, as to not cook the eggs.

Warm the cream and egg mixture over medium heat until it thickens.

Remove the mixture from the heat source and whisk in chocolate and vanilla extract.

Strain the mixture and chill.

Remove the mixture once chilled and fold in whipped cream that has formed stiff peaks.

Chill and serve chocolate mousse with some chocolate scrolls on top.

If you’re wanting a coconut milk based chocolate mousse, try coconut chocolate mousse.

It’s just as thick and delicious as whipped cream based chocolate mousse!

Painting Macarons with Food Coloring

As an Amazon Affiliate, I earn from qualifying purchases.

Painting on macarons with food coloring will give your macarons some color contrast and be more eye catching.

You can paint on macarons using either powdered food coloring or gel food coloring with a couple of drops of almond extract.

In order for you to apply the food coloring to paint your macarons, you will need to use a food safe paint brush.

Macarons have delicate shells that can be damaged if pressed too hard with a paint brush. Apply the food coloring to the macaron gently, as if you were painting a picture.

See video here.

Painting Macarons with Food Coloring

When you’re making up your coloring for painting on macarons, you don’t want to use too much almond extract to make your coloring. If you pour too much, the food coloring will be more like watercolor paint. The color will not go on the macaron as strong, and it will be too runny to really show up on the macaron.

Just use a little almond extract for your coloring. The color will be strong and easily painted on the macaron. The color will not run if you only use a drop or two.

Sometimes the color will dry out in your bowl, just add another drop or two of almond extract to make it liquid again.

You can begin painting your macarons after you have filled them. They will be easier to hold onto, and you won’t have to worry about the color being disturbed if you’re kind of messy when you fill your macarons.

Lay all of the filled macarons on a plate, and pick up the macaron when you’re ready to fill it.

Hold the macaron steady and you apply paint with the other hand. If you lay the macaron on a plate to paint it, you’ll still have to hold onto the macaron because it will move away when you try to apply paint. Macarons are not heavy enough to stay in place as you paint them.

For each color you want to paint your macarons, you’ll need a new bowl. You don’t want any of your colors to mix together, so it’s best to keep the food colors separate from each other.

If you’re changing colors with your paint brush, wash it out with soap and water and rinse well. Dry the paint brush with a dark towel (just in case the color runs and ruins your towel) and then you can paint your next color on your macaron.

How to Paint on Macarons