As an Amazon Affiliate, I earn from qualifying purchases.
Lemon frosting is best made with fresh lemon juice and lemon rind. Lemon frosting should be both sweet and have a bit of tartness to it.
Lemon frosting is has a burst of sharp lemon flavor, and is nicely paired with foods like vanilla cupcakes, macarons, etc.
To make lemon frosting, cream 1/3 cup room temperature butter on high until light and fluffy.
Slowly add 1 cup of icing sugar to the butter. Beat on low while it’s mixing together.
Add 1 1/2 tbsp lemon juice and 1 tbsp of lemon rind. You can add the full amount of lemon rind you get from a whole lemon. The lemon rind releases tart lemon flavor giving it a flavor punch. It will really elevate the lemon frosting.
Add 1/3 cup icing sugar to thicken up the icing.
Taste test the icing and see if you like the thickness. If you need it thicker, add a small amount (1-2tbsp) of icing sugar. If you need the icing a bit thinner, add more lemon juice 1 tsp at a time.
If your icing is a bit too tart for your liking, you can add 1/2 tsp vanilla extract which will counteract the lemon flavor and tone it down so it’s a bit more creamy.
Making lemon frosting is simple and easy, but make sure you adjust it to your liking. You can make your icing as thick as you want it for cupcakes, or a bit thinner for piping on macarons.
Can you use lemon extract instead of lemon juice
You can use lemon extract instead of lemon juice. Use about 1/16-1/8 of a tsp of lemon extract to your frosting.
How do you make yellow icing
To make your icing yellow, you can add
1/8-1/4 powdered yellow food coloring
a small bit of yellow gel food coloring on the end of a toothpick
3-8 drops of liquid yellow food coloring
If you’re using liquid yellow food coloring, add 3 drops initially and mix together. Only add 1 extra drop at a time and mix together to make sure you don’t overdo the coloring.
If your icing becomes too thin using liquid food coloring, add 1-2 tbsp of icing sugar to your icing to thicken it up to your liking.
As an Amazon Affiliate, I earn from qualifying purchases.
A cheese calzone is a calzone that has it’s base a mixture of cheeses. Typically a cheese calzone would consist of mozzarella, ricotta, and parmesan cheeses. The cheeses are mixed with breadcrumbs and herbs to give it a good base before placing the cheese filling in the calzone dough. A cheese calzone can also be mixed with meats including salami, ham, prosciutto, or pepperoni.
How do you seal a calzone?
The calzone dough is sealed with a bit of egg and then pressed down with a fork to seal the edges.
Calzone Dough vs Pizza Dough
Calzone dough and pizza dough are actually same type of dough. Usually people make calzones with their leftover pizza dough. To use pizza dough for calzone dough, roll it out into a rectangle. Cut strips of dough that are quite wide ~6 inches wide & 12 inches long. It doesn’t have to be perfect, it depends how large you want your calzones. Place the filling on the bottom half of your cut rectangles. Fold and stretch your calzone dough over your filling and seal the edges with water or a bit of egg. Then using a fork, seal the calzone dough around the edges and you’re ready to bake them.
Calzone fillings that are vegetarian
spinach
onions
peppers
mushrooms
Do calzones have ricotta?
Calzones can have ricotta in them, along with a mixture of other cheeses like parmesan and mozzarella. Ricotta calzones can also be mixed meats and other vegetables to be a more balanced meal for dinner.
Calzones don’t usually have sauce, but you can serve marinara sauce with your calzones for dipping sauce. Another sauce to serve with your calzones is garlic butter to dip your calzone into.
What goes good with a calzone?
There are countless foods that go well with calzones. You’ll want to balance out the flavors of your calzone to the side you are picking for your dinner. Don’t pick two similar foods, try to select complimenting foods for your meal.
As an Amazon Affiliate, I earn from qualifying purchases.
If you have too many potatoes on hand, you need to figure out what you’re going to do with all of them. You need to decide if you want to store them, cook them, or freeze them.
How to Store Potatoes
To store your potatoes at room temperature, place them in a dark, dry area. They will stay good for a couple of weeks.
If you’re wanting your potatoes stored for longer, there are a couple of other options.
Things to keep in mind for plating a charcuterie board
Height: Vary the heights of your cheeses. Place your Brie, Boursin, Blue Cheese in large pie shaped pieces standing up. Lie flat with the other cheeses that you plan to slice.
Color: Green/red grapes, mint leaves. Fruit slices – red skins for apples, green skins for pears. Brown nuts. Light colored cheeses.
Texture: Textured whole seed mustard. Smooth honey. Soft and hard cheeses. Soft and hard cured meats.
Shopping List for Charcuterie
Select your own cheeses, meats, condiments, and plating foods that fit best for you. Pick condiments that you have at home to make it easy on yourself. Pick only a couple to maybe a few of the cheeses and meats. You don’t need more than 3 of each for your guests.
Cheese
Brie
Gorgonzola
Aged cheddar
Aged smoked cheddar
Parmesan
Camembert
Goat
Burrata
Boursin
Meat
Salami
Prosciutto
Capicola
chorizo
Ham
Foie Gras
Condiments
Mustard
Red pepper jelly
Honey
Fig jam
Pomegranate jelly
Dried cranberries
Almonds
Walnuts
Pecans
Cashews
Sliced pickles – pickles for cheese board are typically dill pickles
Olives
Sliced apples
Sliced pears
Breads & Crackers
Crackers
Raincoast Crisps
Pita chips
Baguette
Extras
grapes
pretzels
rosemary sprigs
mint sprig
raspberries
strawberries
blueberries
basil leaves
pineapple cubes
Charcuterie vs Cheese Board
The difference between charcuterie and a cheese board is charcuterie has both cheese and cured meats on the board.
A cheese board would be a no meat charcuterie board which can be just as delicious as regular charcuterie.
If you’re going with a no meat charcuterie board, pick a few more cheeses (5-7 cheeses) and a couple more condiments for the added variety,
What kind of mustard do you use for a charcuterie board
Typically whole grain mustard is used for a charcuterie board. Whole grain mustard has the seeds still visible in the mustard, giving it a textured coarse look.
How to put together a charcuterie board
Place all of your condiments into small bowls, or directly onto the charcuterie board. Group them into sections. Try to vary the textures and colors when placing them onto the board.
Put your cheeses onto the board next. Keep in the mind the heights of the cheese, and fan out the flat cheese for a tasteful look.
Roll up the meats that are long pieces up so they look presentable. Fan out the other meats that are cut into disks.
Place your breads and crackers onto the board. Try to fan out the bread pieces and stack the crackers or fan them out if your have the room. If you don’t have enough room on your food serving board, you can place them on a separate dish.
Last but not least, the plating items. These are the items that dress up the board like fruit, or fresh herbs. If you’re putting sticks of pretzels onto your board, you can either lie them flat, or place them in a tall glass so they add the height variation to the charcuterie board.
Serve your plated charcuterie board immediately. If you’re not serving it right away, place it in the fridge with some plastic wrap while your waiting.
How to transport a charcuterie board
To transport a charcuterie board, you’ll want to find something you can put the entire plate in, that has high sides.
This could be a reusable grocery box, a cardboard box, or a plastic bin. Find one that it fits snugly in. Keep your charcuterie board covered during transport with plastic wrap.
Charcuterie board themes
Christmas Charcuterie Board: add decorative cranberries or small cedar branches to your charcuterie board
Halloween Charcuterie Board: add small gourds to your charcuterie board, or some spooky decorations like fake spiders or skeleton bones
Valentines Charcuterie Board: add a bowl of cinnamon hearts to your charcuterie board or some chocolate dipped strawberries
As an Amazon Affiliate, I earn from qualifying purchases.
To seal dough, this depends on what type of dough you are sealing. If you’re sealing puff pastry, use a bit of water or egg to seal the edges together. You can pinch the pastry together to seal the dough.
Be sure not to overfill with filling. If any of your filling gets on the pastry you want to seal, this can make it difficult to seal the pastry together. This is due to the oil or fat that is present in your filling. Water or eggs cannot seal fat together, so it makes it difficult to seal your dough.
When making foods like a calzone or a sausage roll, make sure your dough is at room temperature. This will make it easy to roll out and seal your dough.
Dip your finger into a tiny bit of water
Run your finer around the edges of the dough you want to seal, dipping with more water as needed.
Pull the dough over your filling. Seal the dough first with your fingers. Squish the dough together firmly.
Use a fork to push the dough together to create the final seal for your dough.
Bake your dough.
Enjoy!
Once you’ve sealed the dough with your fingers by pushing down on the dough, use a fork to press down on the edges of the pastry to complete the seal. The calzone/dough pockets need to be poked on the top with a fork to allow for aeration. This helps let the steam out of your food when it’s cooking. The seal will remain intact without the steam trying to push open your pastry dough.
How to seal puff pastry without eggs
You can seal puff pastry without eggs by using water. Dip your finger into a dish of water and run your finger down the pastry where you plan to seal the edges. Press the edges together. Then use a fork to push the seams together which will create a good seal for puff pastry.
How to seal pastry edges
Pastry edges can be sealed using water or egg along the very edge of pastry. Squish the pastry edges together once you have wet the edges with water or egg. This should hold the seal well for pastry.
What is a pastry crimper?
A pastry crimper seals the edges of dough and adds decoration to the dough as you run it along the edges. A pastry crimper is going to cut the dough for you to give you that beautiful edging on ravioli, pie crust, etc.
A pastry crimper is also known as a pastry edger.
You can make decorations for your pie crust using a pastry edger. If you want to make some decorations for the top of your pie crust, you can use cookie cutters to cut your pie crust into shapes. Then use your pastry edger to make the edges have a bit more texture and depth to them. Your guests will love how beautiful your pie turns out.
If you don’t have a pastry edger, you can also use your fingers to pinch the pie crust to make it have triangles all the way around the pie. Another way to decorate the pie ege is by pushing the dough in between your 1 index fingers and folding it in a tiny bit at an angle. This will create long pieces of dough that will fold in and create a rope looking decoration all around your pie. If you want a more simple design, push the tip of your finger into the dough all the way around the pie to make small rounded circles for your pastry edge. You can get creative with utensils at home by using a fork and criss crossing a design on your pastry edge.
As an Amazon Affiliate, I earn from qualifying purchases.
Dice butter by getting your exact amount out of your fridge. The butter should be cold before dicing.
Put the butter on a cutting board. Slice the butter using a knife every 1 cm.
Slice the butter the opposite way creating squares that are 1 cm in thickness.
Turn the butter onto it’s side, and slice the butter horizontally every 1 cm. Now you have diced your butter to create cubes of butter that are 1 cm x 1 cm x 1 cm.
What is cold butter
Cold butter is butter that is in the fridge which has a temperature of 2-6 degrees Celsius. Typically cold butter is used to cut into recipes used for baking scones and pastry.
How to cut butter into flour using a food processor
Cutting butter into flour with a food processor is very simple.
Set up your food processor using your S blade.
Place all of your dry ingredients into the food processor.
Place cold butter that has been cubed into the food processor.
Pulse the food processor in short intervals until the butter/flour mixture resembles coarse crumbs.
How to slice butter
Butter that needs to be sliced must be at fridge temperature. Get a sharp knife and put the butter on a cutting board. Place your knife as close to the edge of the butter as possible and push down your knife into the butter. Your butter should cut nicely into sections.
What is the tool that cuts fat into flour
The tool that is used to cut fat into flour is called a pastry blender. A pastry blender has sharp metal running the length of the tool that cuts butter into sections. The pastry blender is pressed into the butter and then turn a 1/4 turn when in the dry ingredients. This creates the coarse crumbs.
How to grate butter without a grater
Have your butter in the freezer before you try to grate your butter. If you don’t have a grater, you can use a potato peeler to grate butter for your recipe. A potato peeler is an easy to use tool to grate butter without a grater. It will create longer strands of butter than a grater, but it will work in a pinch.
What can you bake with unsalted butter
Unsalted butter is used in baking for recipes that need a controlled amount of salt. Salt can add a lot of flavor in recipes which can ruin the flavor if you use salted butter instead of unsalted butter. Unsalted butter is much fresher than salted butter. Unsalted butter is only has a shelf life for 1 month, versus 3-4 months for salted butter.
You can bake several foods with unsalted butter:
Croissant dough
Pastry cream
Scones
Caramel sauce
Pastry
Pie crust
Tart shells
Why do you cut butter into flour?
Butter is cut into flour to create small pieces of butter that resemble coarse crumbs. The small pieces of butter melt into the dough as it bakes. This creates flakes of buttery pastry that melt in your mouth. Pastries that are made with butter that is cut into flour need to be carefully mixed when adding liquid ingredients. The pastry dough should not be overmixed. Make sure you use gentle mixing for your making your pastry dough.
As an Amazon Affiliate, I earn from qualifying purchases.
Serving ice cream at a dinner party can be a fun and exciting dessert to serve your guests. Dinner parties are typically fancy, formal, and people expect something more than the norm.
To impress your guests, there are a few ways to serve ice cream for your dinner party.
How to Serve Ice Cream Buffet Style for a Dinner Party
Serving ice cream buffet style is all in the preparation. You need to have a few small bowls for toppings for your ice cream. Select 4-5 toppings for your dinner party. Prepare your toppings in your small bowls before your guests arrive. Pick 1-3 flavors of ice cream for a bit of variety. Let your guests make their own buffet style ice cream.
25 Toppings for ice cream:
Oreo crumbs
sprinkles
caramel sauce
chocolate sauce
strawberry sauce
bananas
mango
kiwis
strawberries
blueberries
blackberries
apples
pecans
Rolos
chocolate chips
peanut butter cups
whipped cream
pretzels
marshmallows
salted caramel sauce
toffee bits
hot fudge
slivered almonds
mint chocolate chips
brownie pieces
How to Serve Layered Ice Cream for a Dinner Party
Making a layered ice cream for a dinner party should be prepared 1 day in advance to have the ice cream freeze well before serving.
You’ll need:
as many small half sphere silicone molds as guests coming to your party
3 types of ice cream that go well together, or 2 types of ice cream + chocolate ganache that has been frozen
1-3 toppings for the ice cream
Decide if you want to do 3 layers of ice cream, or 2 layers of ice cream and 1 inner layer of chocolate ganache. You could make dark chocolate ganache, milk chocolate ganache or white chocolate ganache as your center filling. This should be made the day before you’re preparing your molds, and then frozen so you’re ready to fill your silicone molds the following day.
Begin by selecting the ice cream for your outer layer. Your outer layer will be the one that will have your toppings on it.
Place your ice cream in the silicone mold. Use a metal spoon to press the ice cream around so that all of the sides are covered in ice cream. Try to make it a 1/2 cm in thickness. Place each silicone mold in the freezer in an airtight container as you complete them. They will start to melt very quickly and it will be messy.
Freeze for 30 min – 1 hour. Then you’re ready for your next layer. Select your inner layer of ice cream. Use a fresh metal spoon to put the ice cream in the molds. Press the ice cream into the first layer so it’s completely covered. The thickness isn’t as important for this one, just make sure you leave a bit of space for the center flavor.
Freeze for 30 min – 1 hour. Now you’re ready for your final layer. Use a melon baller or a fresh spoon to scoop your center layer of ice cream or ganache. Chocolate ganache is typically very hard when it comes right out of the freezer, so it’s best if you thaw it out for 5-8 min before trying to scoop it. Press your final layer into your silicone mold. It doesn’t have to be flat by any means, just make sure it’s filled and pressed into your second layer.
Freeze your silicone mold dessert overnight.
When you’re ready to serve your ice cream for your dinner party, first remove the silicone mold from your ice cream. Use your fingers on either side of the silicone mold to peel the outer silicone mold off of the ice cream, with your thumb on the top of the mold pushing the ice cream out. Try to take them out and place them directly onto your serving plate.
Once you have all of your desserts on their serving plates, you can top your ice cream. Use 1-2 toppings for your layered ice cream dessert.
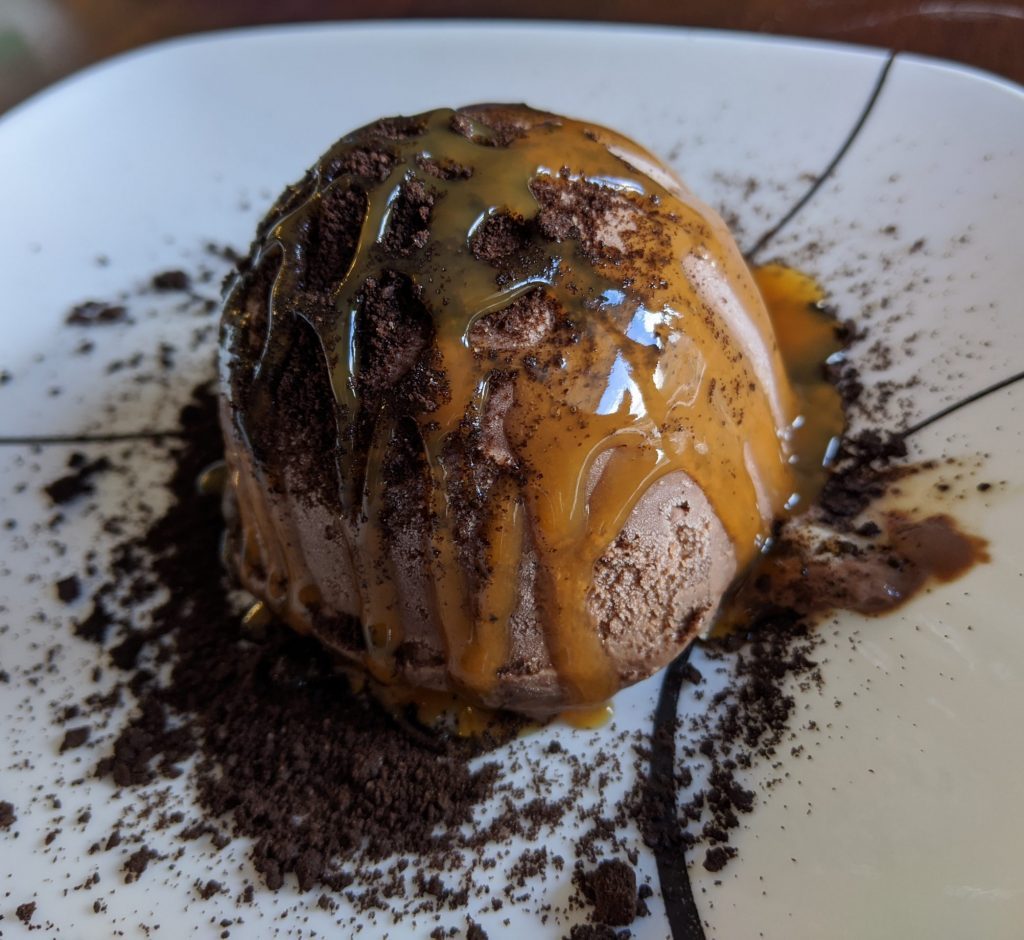
Tartufo made with silicone mold
Creating this layered ice cream dessert is called a “Tartufo”.
What is a Tartufo?
A tartufo is an Italian dessert made of 2 or more ice cream flavors. The center is usually fruit filled – raspberry, strawberry or cherry. It’s topped with chocolate, cocoa powder, cinnamon or nuts traditionally.
This is one of the most impressive desserts to serve at a dinner party. It’s fairly simple, but it is time consuming layering the ice cream. Your guests will love pressing their spoon into their dessert and seeing the layers.
As an Amazon Affiliate, I earn from qualifying purchases.
You can make mouthwatering, chef worthy sandwich platters for your next party.
Preparing sandwiches for a party should be done in the morning on the day of the party, so that they can stay as fresh as possible. The bread will become soggy if sandwiches are prepared the day before.
You can pick 3-4 different types of sandwiches so you’ll have a variety for guests to choose from.
It’s best to prepare 1 sandwich per person attending your party.
Each sandwich you prepare can be cut into 4 triangles, 3 rectangles, or 2 circles so they are individually portioned and small in size.
Using a variety of types of bread will give your guests an eye-catching sandwich platter. Try using mini buns, crostini’s, open faced sandwiches, or different types of bread together.
Sandwiches can be prepared on sour dough, French bread, croissants, pumpernickel, multigrain, whole wheat, rye, or white bread.
Softened cream cheese is beat together using a hand mixer with mayo, sour cream, fresh lemon juice, minced garlic, dill, chives, onion powder, salt and pepper.
Each side of bread is coated in herbed cream cheese, and then slices of cucumber are placed on top.
herbed cream cheese
cucumber slices
Pesto Mozzarella
Pesto mozzarella sandwiches are caprese sandwiches with a few added veggies.
You can use fresh mozzarella for this creamy sandwich, and fresh pesto spread on each side of bread to make this delicious sandwich.
Arugula is added to pesto mozzarella sandwiches for an earthy toned sandwich.
Pesto mozzarella sandwiches are best served on focaccia bread.
Chicken salad sandwiches are made by mixing together mayo, sour cream, parsley, green onions, tarragon, fresh dill weed, fresh lemon juice, garlic powder and salt and pepper.
Chicken salad is spread onto the bread in a thick layer, along with a few cucumber slices.
Cubed chicken, raisins, and toasted sliced almonds are mixed into sour cream mixture to full coat the chicken to made the chicken salad base.
Another slice of bread is placed on top, and a toothpick is placed into the center of the sandwich to hold it together.
Assemble the sandwich by spreading a thin layer of herbed cream cheese on one slice of bread, and top with smoked salmon, red onions, alfalfa sprouts, fresh dill weed, capers, and a sprinkle of salt and pepper.
chicken
cucumber
raisins
toasted sliced almonds
mayo
sour cream
parsley
green onions
tarragon
fresh dill weed
fresh lemon juice
garlic powder
salt and pepper
Avocado and Cucumber
Avocado sandwiches can be served with garlic mayo, hummus, or balsamic reduction.
You can add a few greens such as red leaf lettuce or sprouts to your avocado sandwich.
garlic mayo or hummus
lettuce
sprouts
feta
cilantro
balsamic reduction
Tuna Salad
Tuna salad sandwiches are a favorite sandwich for many with its creamy and crunchy texture.
Tuna salad sandwiches are made by mixing together mayo, Dijon mustard, green relish, fresh lemon juice and pepper.
Add drained tuna and chopped celery to the mayo base and mix well.
Spread tuna salad on top of one slice and bread, and add the other piece of bread on top.
drained tuna
mayo
Dijon mustard
green relish
lemon juice
pepper
chopped celery
Jalapeno Havarti and Sundried Tomato
Jalapeno Havarti cheese sandwiches are spicy sandwiches made with chipotle mayo to give it a bit of a kick.
You can even add a few slices of pickled jalapenos in your sandwich if desired.
Jalapeno Havarti and sundried tomato sandwiches are best served on sourdough bread.
jalapeno Havarti
sundried tomatoes (julienned)
dill pickles (sliced thin)
sprouts
avocado slices
red onions
garlic mayo or chipotle mayo
Strawberry, Basil and Cream Cheese
Strawberry sandwiches have a light fruity flavor to them with a bit of earthy tones from the basil leaves.
Strawberry sandwiches are typically made on white bread.
Strawberry jam is spread over one slice of bread, and softened cream cheese is spread on the other side.
Strawberry slices are layered on top of the cream cheese slice of bread, along with a few fresh basil leaves.
The other slice of bread is placed on top, and is ready to serve.
You can use a cookie cutter to cut a heart out of one slice of bread, and have a strawberry poking through the window for an extra special treat for guests.
strawberry slices
basil leaves
cream cheese
strawberry jam
Mediterranean
Mediterranean sandwiches are filled with savory tzatziki sauce and feta cheese.
Mediterranean sandwiches are filled with juicy tomato and cucumber.
Feta and tzatziki sandwiches are best prepared on focaccia bread.
As an Amazon Affiliate, I earn from qualifying purchases.
Making ice cream at home without needing an ice cream maker is possible by using ice and salt together.
Is salt really necessary to make ice cream?
Yes. Salt lowers the freezing temperature of water. So your ice with salt together end up being colder than frozen ice cubes. This makes the ice cream freeze much faster than if you were just using ice cubes without the salt.
To make instant ice cream you’ll need to gather a few items:
4 trays of crushed ice cubes – approximately 1 Litre of ice cubes
90 mL coarse salt
1-3 L Ziplock bag
1-975 mL Ziplock bag
Instant Ice Cream
125 mL heavy cream
30 mL sugar
2 mL vanilla extract
50 mL fruit (chopped frozen fruit)
In a 3 L Ziplock bag, place both the salt and ice together.
In a 975 mL bag, place heavy cream, sugar, vanilla, and frozen fruit and seal completely.
Place the small bag inside the big bag.
Massage the bags together for 5-10 min. Wear oven mitts to prevent your hands from getting too cold.
Serve immediately. Recipe has enough ice cream for up to 2 people.
We use cookies to ensure that we give you the best experience on our website. If you continue to use this site we will assume that you are happy with it.