Ice Cream Presentation Ideas

As an Amazon Affiliate, I earn from qualifying purchases.

Ice cream can be made as a layered ice cream dessert, placed in a chocolate cup, or paired with fresh herbs to present it as a chef’s professional looking dessert.

Use your imagination to create your own ice cream presentation ideas at home.

You don’t need any fancy tools to create beautiful ice cream desserts in your own kitchen.

Layered Ice Cream

You can make a layered ice cream dessert using 2 flavors of ice cream, and a center filling.

We’ll be using a half sphere silicone mold to create this beautifully presented ice cream dessert.

  • 2 types of ice cream
  • chocolate ganache, jam, or vanilla custard for the filling
  • 1-3 toppings for the ice cream
ice cream presentation ideas

If you’re using chocolate ganache as your center filling, make it the day before you’re preparing your layered ice cream. Freeze the chocolate ganache once it’s prepared so you’re ready to fill your silicone molds the following day.

Select the ice cream for your outer layer. Your outer layer will be the one that will have your toppings on it.

how to put ice cream in silicone mold for dessert

Place your ice cream in the silicone mold. Use a metal spoon to press the ice cream around so that all of the sides are covered in ice cream. Try to make it a 1/2 cm in thickness. Place each silicone mold in the freezer in an airtight container as you complete them. They will start to melt very quickly and it will be messy.

Freeze for 30 min – 1 hour. Then you’re ready for your next layer. Select your inner layer of ice cream. Use a fresh metal spoon to put the ice cream in the molds. Press the ice cream into the first layer so it’s completely covered. The thickness isn’t as important for this one, just make sure you leave a bit of space for the center flavor.

Freeze for 30 min – 1 hour. Now you’re ready for your final layer. Use a melon baller or a fresh spoon to scoop your center layer of ice cream or ganache. Chocolate ganache is typically very hard when it comes right out of the freezer, so it’s best if you thaw it out for 5-8 min before trying to scoop it. Press your final layer into your silicone mold. It doesn’t have to be flat by any means, just make sure it’s filled and pressed into your second layer.

Freeze your silicone mold dessert overnight.

how to make desserts in silicone molds

When you’re ready to present your ice cream dessert, remove the silicone mold from your ice cream. Use your fingers on either side of the silicone mold to peel the outer silicone mold off of the ice cream, with your thumb on the top of the mold pushing the ice cream out. Try to take them out and place them directly onto your serving plate.

Once you have all of your desserts on their serving plates, you can top your ice cream. Use 1-2 toppings for your layered ice cream dessert. You can use caramel sauce, chocolate sauce, cookie crumbles, etc.

ice cream presentation ideas

Ice Cream in a Chocolate Cup

Chocolate cups can be made using a silicone mold, plastic cup, or paper cupcake liner.

If you’re wanting to use a plastic cup, you’ll have to cut it off of the chocolate cup once it’s hardened in the freezer.

If you’re using a paper liner, gently peel off of the paper liner when you’re ready to fill your chocolate cup.

Chocolate cups are made using melting chocolate wafers. The melted chocolate is “painted” onto a cup-like surface until it’s entirely covered, right up to the top edges. Make sure the top edges have a good amount of chocolate on them. Otherwise, the edges could break off easily since there wouldn’t be much chocolate holding it together.

Place the chocolate cup in the freezer for at least 1 hour. The freezer will make the chocolate solidify quicker, and it will be much harder than if you put it in the freezer.

When you’re ready to serve your ice cream, remove the chocolate cup from the freezer. Remove the silicone mold from the chocolate cup.

Take an ice cream scoop that will be the perfect size for your chocolate cup and scoop your ice cream. Release the ice cream from the scoop, directly into the chocolate cup.

Top the ice cream with any toppings you like – caramel sauce, crushed cookies, sprinkles, peanut butter cups, etc.

Serve your wonderfully presented ice cream to your guests. They will love breaking up the chocolate cup to eat with their ice cream!

ice cream presentation ideas

Ice Cream with Fresh Herbs

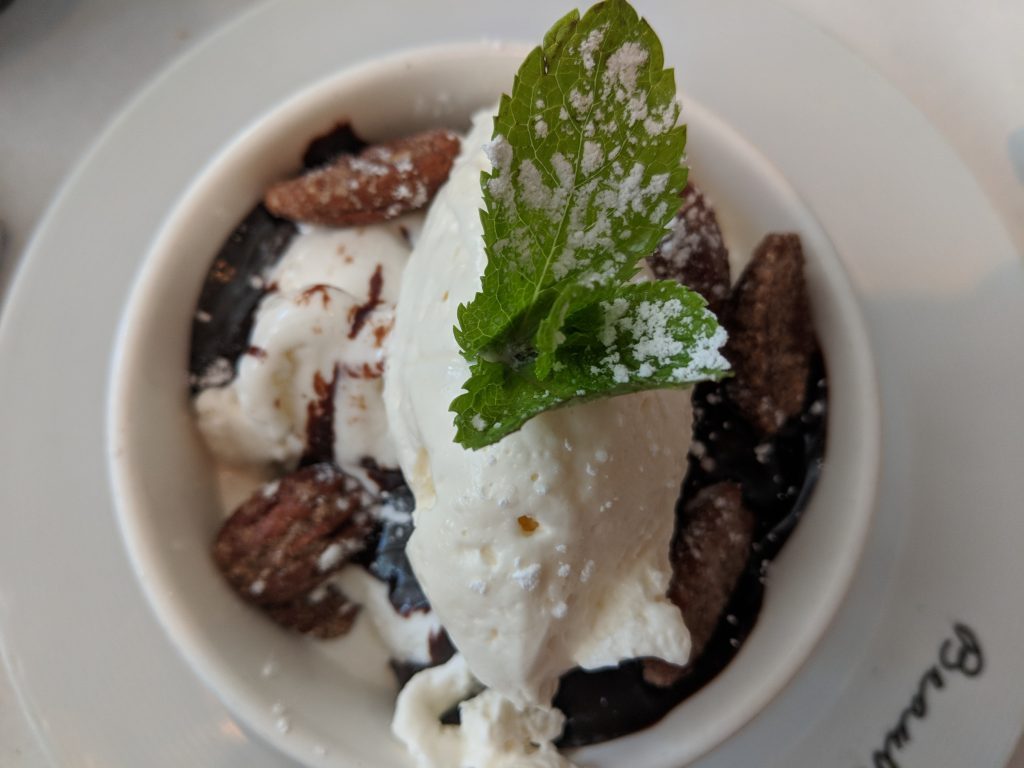
Ice cream can be paired with fresh herbs to give it a hint of extra flavor.

Vanilla ice cream with chocolate sauce and candied nuts can be easily paired with fresh mint leaves for a chocolate mint flavors.

The ice cream will be decadent and creamy with a pop of mint flavor.

ice cream presentation ideas

Ice cream that is flavored with other herbs, like culinary lavender, can be served with a garnish of fresh lavender.

Lavender ice cream has an earthy flavor, and when paired with vanilla gives it a sweeter finish to the ice cream.

Garnishing your ice cream with an herb that matches the flavor of the ice cream is a wonderful presentation idea for ice cream.

Garnish Ice Cream Presentation Ideas

  • freeze dried roses
  • fresh rose petals
  • lemon rind
  • orange rind
  • basil leaves
  • blueberries
  • blackberries
  • raspberries
  • chocolate spirals
  • whipped cream
  • caramel sauce
  • chocolate sauce
  • candied nuts
  • sprinkles
ice cream presentation ideas

23 Types of Tarts

As an Amazon Affiliate, I earn from qualifying purchases.

Tarts can be filled with custard, mousse, fruit, citrus and nuts to make sweet buttery tarts.

Here’s our list of 23 of our favorite types of tarts for you to make right at home.

Types of Tarts to Make

Types of Tarts

Texture of Donuts

As an Amazon Affiliate, I earn from qualifying purchases.

The texture of a donut will tell you how fresh it is, and how it was made. A donut should be crumbly, delicate and melt in your mouth when you bite into the donut.

Texture of the Inside of the Donut

The texture of the inside of a donut should be moist, crumbly, and fluffy.

As you bite into the donut, the donut will crumble and be delicate. The donut should not be dense and hard, this can indicate overmixing of the donut dough, or it can be an older donut.

Donut dough should only be mixed until just combined, so it remains airy and light when it bakes.

When you touch the outside of the donut with your finger, you should be able to press it, and it will bounce back, or it may not come back fully. This will indicate a fresh donut with a fragile outside.

Texture of Donuts

Texture of Glazed Donut

The glaze of the donut will be a smooth, thin layer. When you bite into the donut, the glaze should be effortlessly pierced by your teeth and be well adhered to the donut.

The glaze of the donut should be much thinner than frosting or icing. Glaze is a thinner version of the these types of sugared toppings.

Chocolate ganache is also a topping that is used for glazing donuts. For donuts, the ganache is thinned with butter to create a chocolate ganache glaze that is much thinner for topping donuts.

You should be able to grasp the donut, and easily dip the donut into the glaze, and let it dry on a cooling rack. If you’re adding a garnish, you’ll want to add it prior to the glaze drying.

Texture of glazed donuts

Texture of Garnished and Glazed Donut

A garnish for a glazed donut can add both a unique flavor and texture to your glazed donut.

By adding toasted shredded coconut or nuts, this will add a crunchy texture and enhance the flavor of the donut, which will balance out the texture of the smooth, crumbly donuts as you bite into it.

By adding sprinkles, or lemon or lime zest, this will add a sweet or tart flavor to the donut. The texture of the donut won’t really change by adding these garnishes to your donuts.

Donut topping ideas

You can add many different toppings to glazed donuts including:

  • shredded coconut
  • sprinkles
  • nuts
  • lemon or lime zest
  • crushed cookies
Texture of Donuts

Puff Pastry Desserts with Apples

As an Amazon Affiliate, I earn from qualifying purchases.

Puff pastry is made with laminated layers of butter, making it a creamy and flakey pastry to serve for dessert. Apples go well with puff pastry dessert, given their versatility. Apples can be combined with brown sugar to give them a sweetened taste for a pastry dessert.

Here are 4 of our favorite puff pastry desserts using apples.

Apple turnovers

Apple turnovers are made by baking the apples into a brown sugar and cinnamon sauce.

The sauce coats the apples as they bake in the oven to soften them.

The apple filling is transferred into a piece of puff pastry.

The puff pastry is folded over the apples and is sealed closed.

Egg is brushed onto the apple puff pastry to make it have a glossy look when it comes out of the oven.

Granulated sugar is sprinkled over the pastry to make it have a sugary crust while it cooks.

A few slits can be made in the top of the pastry to let the filling ooze out as the apple puff pastry dessert cooks.

Once the dessert cools down, a vanilla glaze is drizzled on the top of them right before serving.

Puff Pastry Desserts with Apples

Puff Pastry Apple Tart

Puff pastry apple tart is made by rolling out a sheet of puff pastry dough.

The dough is scored around the rectangle shape to make it have an edging around the dough.

This creates the sides of the tart that keep the apples in place as it cooks.

Egg is brushed onto the tart to have a barrier in between the apple mixture and the pastry. The edges of the tart will have a sheen to them when brushed with egg, making it have a professional look to it.

Sliced apples are mixed together with a combination of brown sugar, cinnamon, melted butter, and lemon juice.

The apples are arranged to lay on their side, giving the tart a uniform look to it.

The tart is baked in the oven and then it set to cool.

Once the tart has cooled, a vanilla frosting is drizzled over the tart prior to serving.

Apple Strudel

Apple strudel is made by combining sliced apples, lemon juice, vanilla, brown sugar, cinnamon, flour and raisins into a sauce.

Roll out the puff pastry into a sheet. It should be about 1/3 cm in thickness. Place the dough on a cutting board.

Place the apple mixture down the middle of the puff pastry. Cut the edges of the dough into strips.

Arrange the strips to criss cross over one another. Seal the dough onto itself with a little bit of water.

Brush the apple strudel puff pastry with egg to give it a buttery look to it once it bakes.

Bake the puff pastry apple strudel and let it cool.

Once the apple strudel is cooled, you can add a drizzle of vanilla glaze if desired.

Cut the strudel in slices to serve.

Apple Puff Pastry Roses

Apple puff pastry roses are made by first preparing the apples. The apples are sliced and dipped into a bowl of lemon juice and water mixture to prevent the apples from changing color.

The apples are cooked by placing the the bowl into the microwave and cooking for a 2-3 minutes. This makes the apples soft and more malleable to work with.

The puff pastry is rolled out and cut into 2 x 9″ strips. Spread a layer of apricot jam on the puff pastry. This acts to adhere the apples to the puff pastry.

Arrange the apple sliced on top of the dough, with the skin side poking out. Place 3 layers of apples, alternating over it for more of a layered look.

Fold the dough over to enclose the apples and seal the edges with a little water.

Roll the puff pastry dough into a circle and seal it together with a bit of water.

Place the roll in a muffin tin and sprinkle with a bit of cinnamon.

Bake the apple puff pastry roses and serve immediately.

Puff Pastry Desserts with Apples

6 Pastry Shape Design Ideas

As an Amazon Affiliate, I earn from qualifying purchases.

Pastry shape ideas can be made from using either puff pastry or croissant dough.

Since both of these types of pastry are made with layers of laminated butter, they create flakey, creamy pastries.

They also hold up well to hold custard or jam as center fillings for your unique pastry designs.

How to shape and design pastry

Roll out your dough until it’s about a 1/3 cm in thickness. It should be about as thin as a piece of cardboard. This is a good thickness to work with – not too thin, not too thick for creating shaped pastries.

Here are 6 ways of cutting, designing and shaping pastries.

It’s best to place the pastry on a cutting board, and then cut the pastry using a sharp knife.

Use a tape measure for rough measurements for designing your pastry shapes.

Pastry Shape Design Ideas

How to make a curled shaped pastry

  1. Cut a rectangular shape of pastry dough ~ 2″x4″.
  2. Fill the center will jam or custard.
  3. Pinch 2 opposing pastry dough together to create the curled pastry

How to make a butterfly shaped pastry

  1. Cut a piece of pastry 5″ x 5″.
  2. Cut 2 small triangles on opposing sides of the square.
  3. From the edge of the triangle you just cut, slice the pastry at an angle to create a point. Repeat on the other side.
  4. Fill the centers with custard.
  5. Fold the pastry over the custard downward on one side.
  6. Fold the pastry over the custard upward on one side.
  7. Pinch the ends of the point together.

How to make a duchess pastry shape

  1. Cut a piece of pastry 5″ x 5″.
  2. Cut the square 1 inch from the edges of the square giving a 1 cm border.
  3. Continue cutting into an angle shape.
  4. Repeat on the other side.
  5. Fill the center with custard.
  6. Fold the cut corner over the pastry.
  7. Fold the other cut corner over to the other side.

How to make a windmill pastry shape

  1. Cut a piece of pastry 5″ x 5″.
  2. Cut 4 slices into the pastry starting at the points. Leave a 1″x1″ box in the center for the filling.
  3. Fold the corner of one of the points into the center.
  4. Fold all of the corners into the center.
  5. Fill the center with custard.

How to make an envelope pastry shape

  1. Cut a piece of pastry 5″ x 5″.
  2. Fold the corner of one of the 4 points into the center.
  3. Continue folding each corner into the center of the pastry.
  4. Fill the center with custard.

How to make a center filled pastry shape

  1. Cut 2 pieces of pastry 5″ x 5″.
  2. Cut a circle in the center of one of pieces of pastry.
  3. Remove the circle.
  4. Place the cut pastry on top of the square pastry.
  5. Fill the circle with custard.

How long to bake shaped pastries for

Bake your shaped pastries for 15 minutes at 400 degrees F.

How Does Chocolate Cake Taste

As an Amazon Affiliate, I earn from qualifying purchases.

Chocolate cake tastes rich in flavor. Chocolate cake has a chocolatey hint of flavor from cocoa powder. Chocolate cake has a creamy and buttery taste to it.

What frosting goes best with chocolate cake

Chocolate cake can be frosted with a variety of different icings including: vanilla buttercream icing, cream cheese icing, chocolate icing, chocolate ganache, etc. The frostings can enhance the flavor of the chocolate cake or compliment the flavor depending the choice you make.

Chocolate Icing

Chocolate icing will make the chocolate cake more rich and heavy due to the buttercream base with cocoa powder. Chocolate icing is luscious and buttery and will make your chocolate cake have even more of a heavy chocolate flavor.

Chocolate Ganache

If you’re going for a sweeter and stronger chocolate flavor, top the chocolate cake with chocolate ganache. Chocolate ganache hardens onto the cake, making it have a solidified layer when you cut through the cake. Chocolate ganache is full-bodied, and has a creamy chocolate flavor which will enhance your chocolate cake taste.

Vanilla Buttercream

By using vanilla buttercream for your chocolate cake, it will compliment the flavor, making a more balanced taste to it. Vanilla buttercream is a light, fluffy icing that will tone down the flavor of the chocolate cake, making it a desirable choice of frosting.

Cream Cheese Icing

Cream cheese icing has a unique tangy flavor when paired with a hint of vanilla extract. Cream cheese icing is thick and velvety when added to the top of chocolate cake. It compliments the flavor of the chocolate cake, making it light and sweet.

How does chocolate cake taste

What is chocolate cake

Chocolate cake is flavored with cocoa powder. Chocolate cake is made by adding a series of wet and dry ingredients to create an airy, soft, spongy texture.

Chocolate cake is only mixed until just combined, this creates the crumbly consistency of the cake. If the chocolate cake is overmixed, it can combine dense.

A chocolate cake should be rich in flavor, and easily bounce back when you press your finger it.

What goes well with chocolate cake

Chocolate cake is best served with coffee, tea or milk to help wash down the rich flavor.

Chocolate cake goes with with fresh berries like strawberries or blueberries for an after dinner dessert.

Chocolate cake goes well with vanilla ice cream served alongside it. Vanilla ice cream added to chocolate cake is the perfect addition of texture and flavor.

How to Make an Entremet Cake

As an Amazon Affiliate, I earn from qualifying purchases.

An entremet is a dessert with many different layers and fillings.

What are the components of an entremet cake recipe

An entremet has 5 different components to it: a crust, body, filling, coating, and a garnish.

See video here.

How to Make an Entremet Cake recipe
What are the components of an entremet cake recipe

Cake Base

The cake base of an entremet is the bottom layer of the entremet. 

What is an entremet

Body

The body of the entremet is the main composition of the dessert. There can be a few layers of body in an entremet cake, especially if it is prepared in a 9″ spring form pan.

  • Mousse – made with gelatin so it stays firm
  • Sponge cake – vanilla, chocolate, etc.
  • Syrup soaked cake – (cointreau, orange, stout, amaretto, lemon, raspberry)

Filling

The filling of the entremet is one of the layers in the entremet recipe. The filling can also be the center of a dome entremet recipe.

  • Chocolate ganache
  • Curd
  • Pastry cream
  • Jam
  • Panna cotta

Coating

The coating of an entremet is the outer layer that coats the body of the entremet. It’s also known as the topping of a cake.

  • Dark chocolate glaze
  • Mirror glaze
  • Chocolate ganache
  • Salted caramel glaze
  • Raspberry glaze
  • Caramel glaze

Garnish

The garnish of an entremet is to add decoration to the entremet cake recipe. It’s not necessary, but it does add appeal and makes the dessert eye catching for your guests.

How to Make an Entremet Cake

How to make an entremet dome cake recipe

To make an entremet dome cake, prepare the entremet in a silicone half sphere mold.

  1. Press the body of the entremet into the silicone half sphere mold, making sure to fill all of the crevasses.
  2. Place the center filling of the entremet using a melon baller. At this point you can put more of the body around the center filling. An option too is to put the body component completely over the center filling to cover it. The center looks well presented this way.
  3. Prepare your cake base for your entremet. You can bake the crust in a 9″x13″ pan, and then let it cool down. Use a cookie cutter or glass to “cut” out a perfect circle that will fit your silicone half sphere mold. You’ll have to measure to make sure it will fit.
  4. Place the cake base cut out onto the silicone half sphere mold. Press it in well so it sticks to the body composition of the entremet.
  5. Place the entremet dome cake in the freezer overnight.
  6. Remove the silicone mold from the entremet. Use your fingers to gently pry the mold from the body of the entremet. Press down on the top of the silicone mold to remove the entremet.
  7. Place the entremet on a wire rack with a plate underneath to catch any drippings.
  8. Pour your glaze coating over your entremet.
  9. Add your garnish to the entremet and serve immediately. If it’s too hard to serve, let it thaw for about 10-15 minutes before serving.
How to make an entremet dome cake recipe

10 Creme Brulee Flavors to Taste

As an Amazon Affiliate, I earn from qualifying purchases.

Creme brulee is one of the most divine desserts you can taste.

You can flavor the custard base of creme brulee to make alluring flavors like ferro rocher, salted caramel, lavender, coconut, Irish cream and coffee.

Vanilla

Vanilla creme brulee is made with vanilla beans infused into a custard.

The custard is made by infusing both the vanilla beans scraped from the inside, and the pod into the heavy cream.

The vanilla flavors combine with the cream over a heat source to create the mesmerizing vanilla flavor of creme brulee.

The hot cream is tempered with eggs, and then baked in the oven.

Once the cream brulees have cooled down and been chilled, they are topped with a layer of sugar.

The sugar is melted to create a thin layer of hardened sugar using a kitchen torch right before serving.

Creme Brulee Flavors

Ferrero Rocher

Ferrero Rocher creme brulee is made by making a chocolate custard as the base flavor.

Once the creme brulee has had the top sugar solidified, bits of Ferrero Rochers are topped onto the creme brulee.

With the heat from the sugar, the chocolate should melt, making the flavor combination tantalizing.

Creme Brulee Flavors

Lavender

Lavender creme brulee is made by adding culinary lavender pieces to the heavy cream while it’s warming up.

The lavender flavor infuses into the cream, giving the creme brulee a hint of lavender flavor. Lavender tastes unique in that is has floral notes.

Salted Caramel

Salted caramel creme brulee is made by infusing salted caramel sauce and vanilla beans in the custard while it’s warming up to temperature.

Salted caramel is a unique flavor due to its sweet flavor and salty finish. It’s one of the best flavors of creme brulee you can taste.

Chocolate

Chocolate creme brulee has a rich and creamy flavor to it.

It is made from vanilla bean extract, cocoa powder, and has semi-sweet chocolate melted into the custard.

The melted chocolate gives the creme brulee the decadent chocolate flavor.

You can top your chocolate creme brulee with a few chocolate shavings if desired for a beautiful finished look to it.

Irish Coffee

Irish coffee creme brulee is made with vanilla bean paste, freshly brewed espresso, and Irish Whiskey.

Irish coffee creme brulee has a strong coffee flavor that has a whiskey finish to it.

Irish whiskey has a distinct caramel and oakiness flavor which lingers on your palette for a special creme brulee treat.

Irish coffee creme brulee would be best served on St. Patrick’s day or around Christmas time.

Coffee

Coffee creme brulee is made with vanilla beans and espresso powder.

You could also use fresh espresso to give your coffee creme brulee a stronger flavor to it.

Coffee creme brulee tastes similar to a sweet vanilla latte in dessert form!

Your guests would love to try coffee creme brulee given its special flavor.

Maple Bourbon

Maple bourbon creme brulee is made with maple syrup and bourbon infused into a vanilla custard.

The sweetness of the maple syrup combined with bourbon gives this creme brulee a hint of caramel, vanilla, and oak notes.

Pineapple

Pineapple creme brulee is made by cooking the pineapple with a bit of water and brown sugar.

Once the pineapple has caramelized with the brown sugar, it is pureed using a food processor.

The pineapple is added, along with lemon zest for a citrus flavored pineapple creme brulee.

Coconut

Coconut creme brulee is made with coconut extract and coconut milk.

The coconut milk is heated and added to the eggs to create the custard.

Once the mixture is removed from the heat source, coconut extract is added to the custard to give the coconut creme brulee a stronger coconut flavor for this dessert.

What makes creme brulee such a unique dessert is it has a caramelized sugar layer on top of the sugar.

A thick sugar layer is sprinkled on top the custard, and then a torch is used to melt the sugar into a layer that is solidifies.

The solid sugar layer is made right before serving so it stays hard.

When you take your first spoonful from the dessert, you’ll have to break through the caramelized sugar through to the custard.

The golden crusted sugar combined with the custard layer makes this dessert one of the most rich after dinner treats you can eat.

How to Make Cookies and Cream Milkshake without Oreos

As an Amazon Affiliate, I earn from qualifying purchases.

Making a cookies and cream milkshake only uses 2 ingredients, and can be made in a couple of minutes.

Cookies and cream milkshakes are thick, creamy, and decadent. You’ll love drinking them on a hot summer’s day.

How to Make Cookies and Cream Milkshake without Oreos

To make a cookies and cream milkshake without using Oreo’s, you’ll need a few items before beginning:

  • cookies and cream ice cream
  • milk
  • blender
  1. Set up your blender and add 2 scoops of ice cream to the blender for each drink you are planning on making. You should add about 1/2-3/4 cup of cookies and cream ice cream for each person.
  2. Pour in 1/3 cup of milk to the blender for each drink you are making.
  3. Add 3 ice cubes for each cookies and cream milkshake you are blending.
  4. Blend together.
  5. If it’s too thick, pour more milk into the blender and blend together. If the cookies and cream milkshake is too thin, add more ice cream to your blender. Adjust as needed.
  6. Pour your cookies and cream milkshake into a glass and serve immediately.

How do you make a thick milkshake

A thick milkshake needs to be made with ice cream. Ice cream that is full fat, and made with real cream will give you a much thicker milkshake than using a low fat ice cream.

Milk should be used sparingly, only to make the milkshake a liquid consistency. If you have put too much milk in your milkshake, add more ice cream to thicken the milkshake.

If you want your milkshake to be extra creamy, substitute the milk for heavy cream. Heavy cream is more viscous than milk, therefore it will make your milkshake as thick as possible.

How do you make a thick milkshake

How long do you blend a milkshake for

You should blend a milkshake for 1-1.5 minutes until the consistency is thick but has some liquid, enough to pour into a glass.

Sometimes you need to adjust the milkshake, if it’s too thin you need to add more ice cream. If your milkshake it too thick, you need to add milk.

The final blending of the milkshake should be about 60-90 seconds to make sure the components of your milkshake have fully combined.

How long do you blend a milkshake for

How do you thicken a milkshake without ice cream

You can thicken a milkshake without ice cream by adding a banana to your milkshake. Blended bananas create a thick substance that blend well with other ingredients. You can create your milkshake without ice cream by using ice, bananas, and fruit.

How to Make Cookies and Cream Milkshake without Oreos

How to Paint Cookies

As an Amazon Affiliate, I earn from qualifying purchases.

Cookies can be colorized and decorated by simply using them as a blank canvas. You can paint cookies all the way over the edge to give it a cool effect that it’s folding over the cookie. It makes it look like there’s no end to the design.

What kind of cookies can be painted

  • macarons
  • shortbread cookies
  • sugar cookies
  • cookies topped with royal icing
How to Paint Cookies

What supplies do you need to paint cookies

Food Safe Paint Brushes for Decorating Cookies

Paint brushes used for cookie decorating must be food safe.

Unfortunately you cannot use any paint brush you have at home for cookie decorating. It does need to be a food grade paint brush.

They look just like regular paint brushes, and they have a ton of different shapes that they come in.

You can find everything from a fan shape to a very tiny pointed food safe paint paint brush for decorating cookies.

Powdered food coloring for Decorating Cookies

To use powdered food coloring for decorating cookies, you’ll have to mix it with a little bit of almond extract.

The alcohol in the almond extract binds to the powdered food coloring creating the perfect medium for painting cookies.

Dip your paint brush into the food coloring and gently brush your designs onto your cookies.

See video here.

Food Safe Paint Brushes for Decorating Cookies

How to paint cookies that are topped with royal icing

If your cookies are baked and have the royal icing fully dried, you can take your food grade paint brush and paint on the icing. This makes it a little easier to get a few different colors onto your cookies without having to make a new color of icing.

You can brush the tops of tiny dots of dried royal icing to give them a little more pop of color. For example, it’s easy to make gold paint for cookies using powdered food coloring, but it’s not very easy to make gold icing. You would need a specialty store in order to get that in a water based food color, or gel color.

This is how gold macarons are made. They use gold powdered food coloring mixed with almond extract. Then the color is painted onto the macarons to make it shimmer gold.

What supplies do you need to paint cookies

If you’re interested in trying out painting designs on cookies, try it out at home with your own food safe paint brushes and powdered food coloring. You can experiment and combine colors to create new ones just like your water based food colors. Try it for yourself on your next baking adventure!